Audio Noise Reduction Online without Damaging the Voice
If you've ever recorded a podcast, interview, voiceover, or video and noticed that annoying hiss in the background — or the constant hum of an air conditioner ruining everything — you know exactly the problem that noise reduction solves.
In this complete guide, you will learn what audio noise is, why it appears, what the most common types are, and, most importantly, how to remove it effectively using free online tools, without needing to install any software.

Table of Contents
- What is Audio Noise?
- Common Types of Audio Noise
- Why Removing Noise is Essential?
- How Does Noise Reduction Work?
- How to Reduce Audio Noise Online: Step-by-Step
- Advanced Tips for Better Results
- Complementary Processing Techniques
- Prevention: The Best Strategy Against Noise
- Real Use Cases: When Noise Reduction Saves the Recording
- Frequently Asked Questions (FAQ)
- Conclusion
What is Audio Noise?
Audio noise is any unwanted sound that appears in a recording and is not part of the original content. It can be an almost imperceptible background hiss, a constant electronic hum, the sound of traffic outside, or even the office air conditioner.
From a technical standpoint, noise is measured relative to the useful signal (the voice, instrument, or sound you want to capture). This ratio is called SNR (Signal-to-Noise Ratio). The higher the SNR, the better the audio quality. A recording with a low SNR is one where the noise competes with the main signal, making the audio tiring to listen to and unprofessional.
Noise appears for several reasons: low-quality equipment, an inadequate recording environment, electrical interference, excessive audio file compression, or even issues with the computer's sound card.
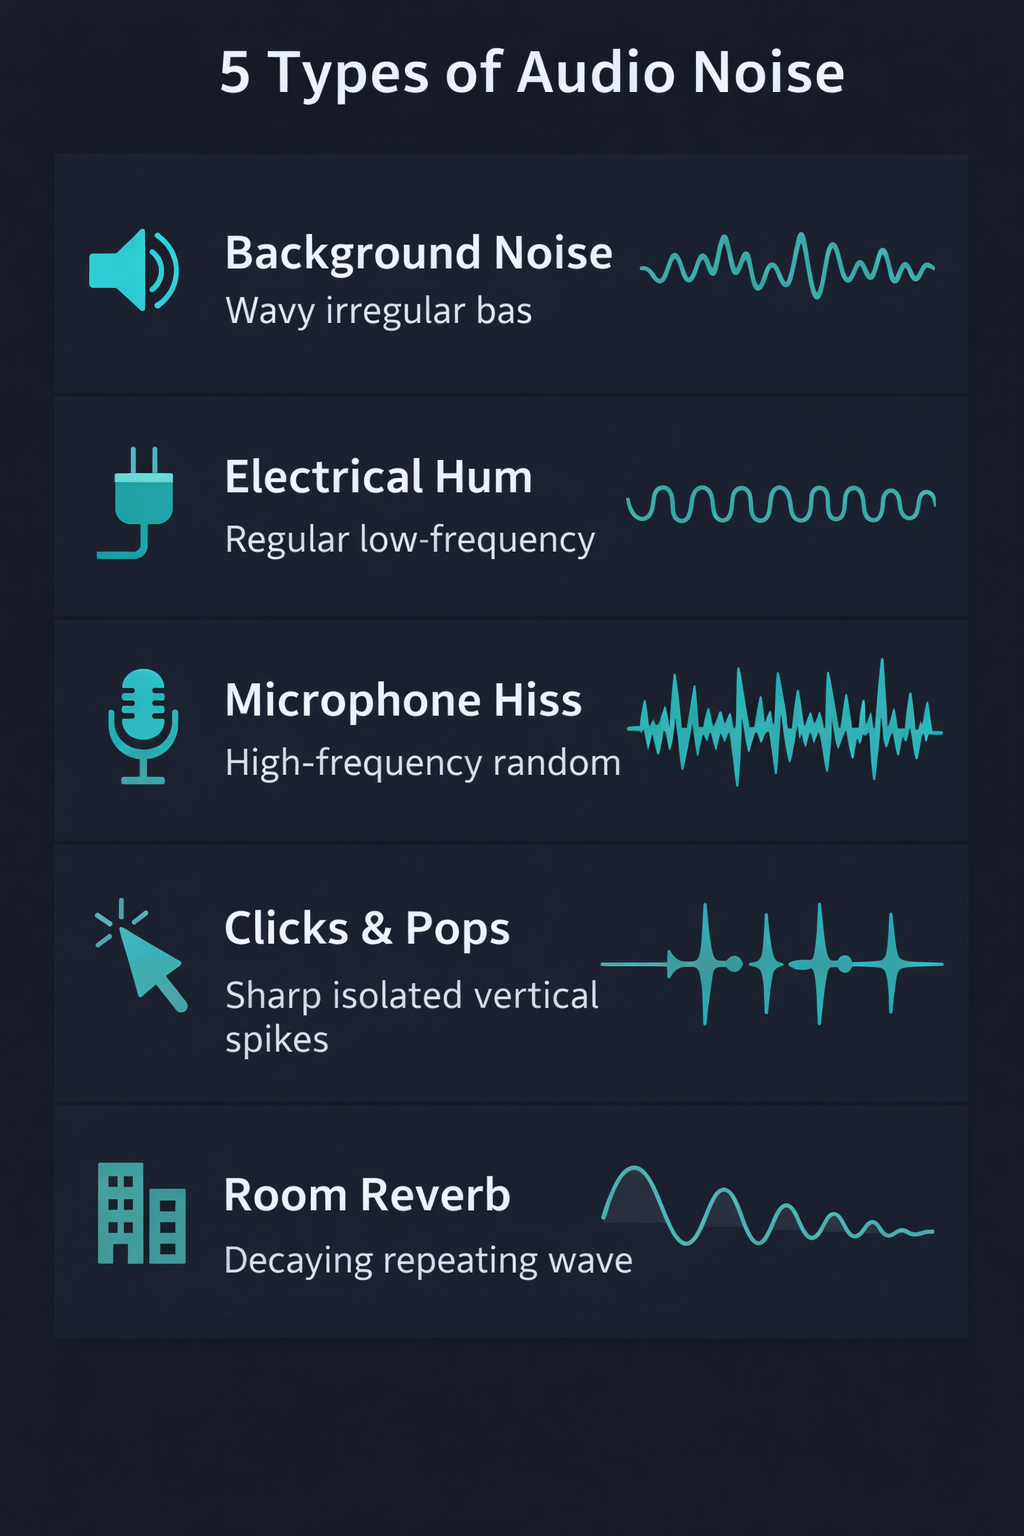
Common Types of Audio Noise
Understanding the type of noise you are dealing with is the first step to removing it effectively. Check out the main types:
1. Environmental Background Noise
Ambient sounds captured by the microphone during recording: fans, air conditioning, rain, traffic, or people talking in the distance. It is the most common type in home recordings and outdoor interviews.
2. Microphone Hiss
That constant "ssss" sound that appears in recordings, especially when the microphone gain is too high or the microphone is of low quality. It is characteristic of recordings made with built-in laptop or cell phone microphones.
3. Electrical Hum
A rumble or hum at specific frequencies — normally 50Hz or 60Hz — caused by electrical interference. It usually appears when cables are close to power sources, when electrical grounding is inadequate, or when there are ground loops in the equipment.
4. Clicks and Pops
Sudden percussive sounds caused by defective cables, poor contact issues in connectors, or plosives (the consonants "P" and "B" spoken too close to the microphone).
5. Compression Artifacts
Digital artifacts introduced by excessive audio file compression — such as MP3s at a very low bitrate. This creates audible distortions, mainly in high frequencies.
6. Excessive Reverberation
The echo of the recording environment making the voice sound "cavernous". This is very common in rooms with hard flat walls, kitchens, or spaces lacking acoustic treatment.
Why Removing Noise is Essential?
You might be asking: "Can't the listener just ignore a background hiss?" The answer is: not for very long.
Studies in psychoacoustics show that constant background noise increases listening fatigue — the listener tires faster and has more difficulty understanding the content. In podcasts and educational videos, this directly translates into early content abandonment.
Furthermore:
- Professional credibility: Audio with noise conveys an amateurish image, even if the content is excellent.
- Accessibility: People with hearing impairments or relying on automatic transcription devices are directly affected by background noise.
- Platform algorithms: YouTube, Spotify, and podcast platforms consider audio quality as a factor in user experience ranking.
How Does Noise Reduction Work?
Digital noise reduction works through algorithms analyzing the audio frequency spectrum and identifying constant sound patterns likely to be noise (and not useful signal).
The classic process involves two steps:
- Creation of the noise profile: The software analyzes a section of the audio containing only noise (no voice or music) — usually a few seconds of silence before or after the recording. This profile serves as the noise's "fingerprint."
- Spectral subtraction: With the profile defined, the algorithm mathematically "subtracts" the noise pattern from the entire file, preserving the frequencies belonging to the useful signal.
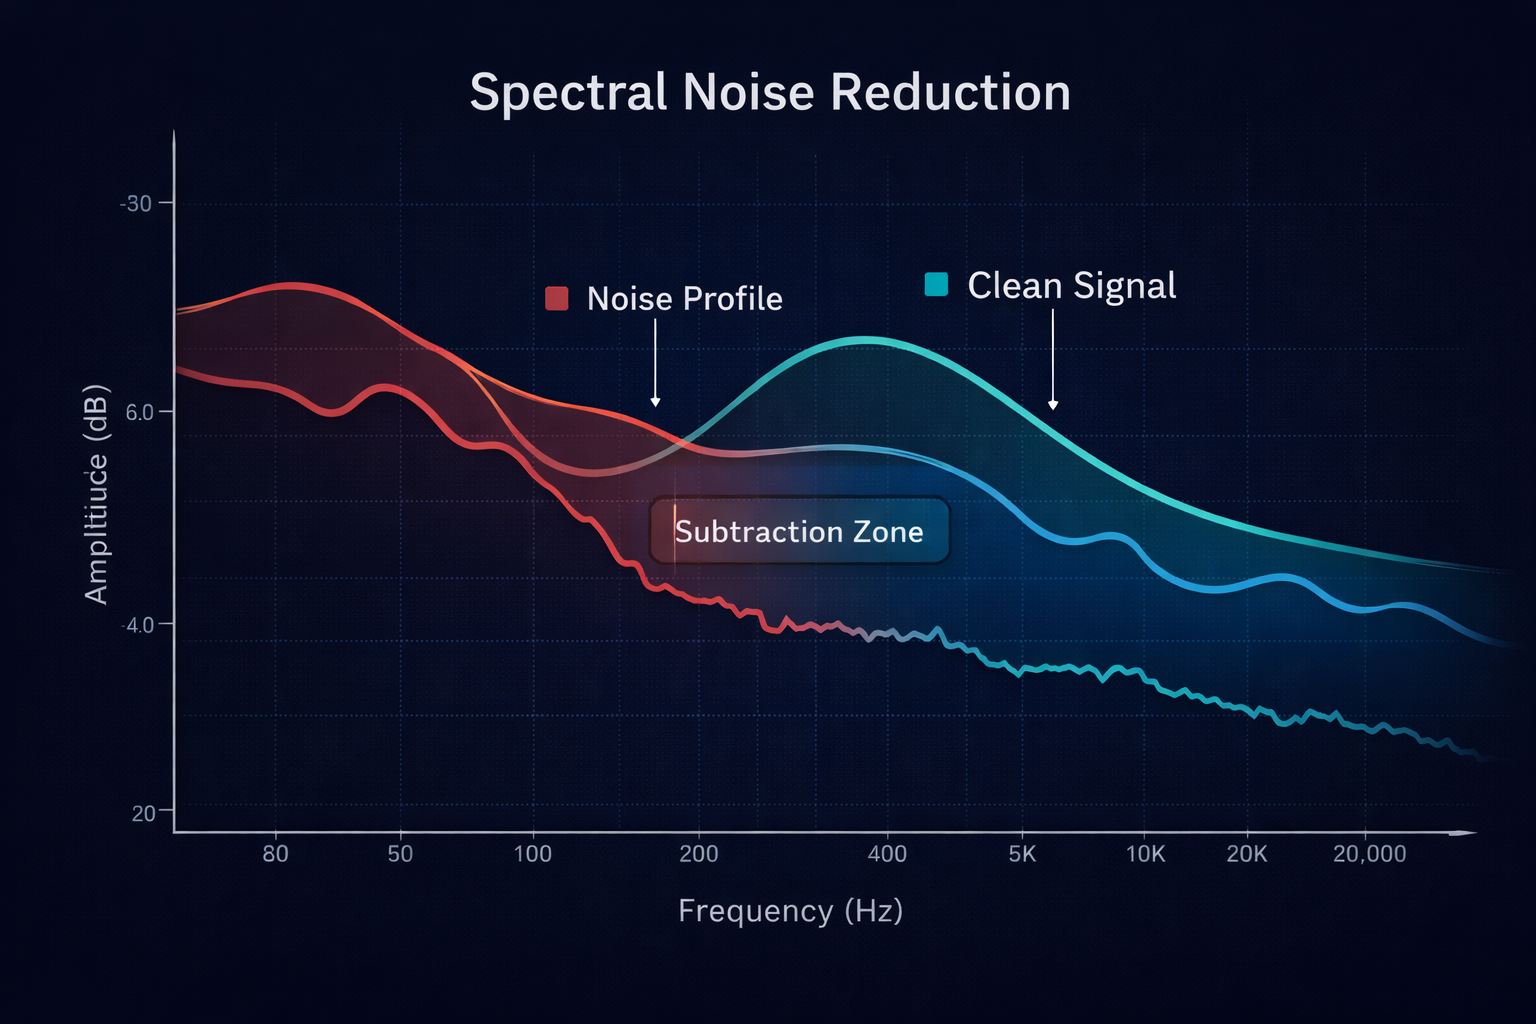
Modern tools, like the one available at Audio-Editor Online, use advanced techniques based on signal processing to perform this analysis in real time, without you having to manually identify a noise section.
How to Reduce Audio Noise Online: Step-by-Step
With Audio-Editor Online, the process is simple, free, and works directly in the browser — no installation required, and your files are never sent to external servers.
Step 1: Upload the audio file
Go to the noise reduction tool and upload your file. The most common formats are supported: MP3, WAV, FLAC, OGG, and M4A. Processing takes place locally in your browser, ensuring absolute privacy.
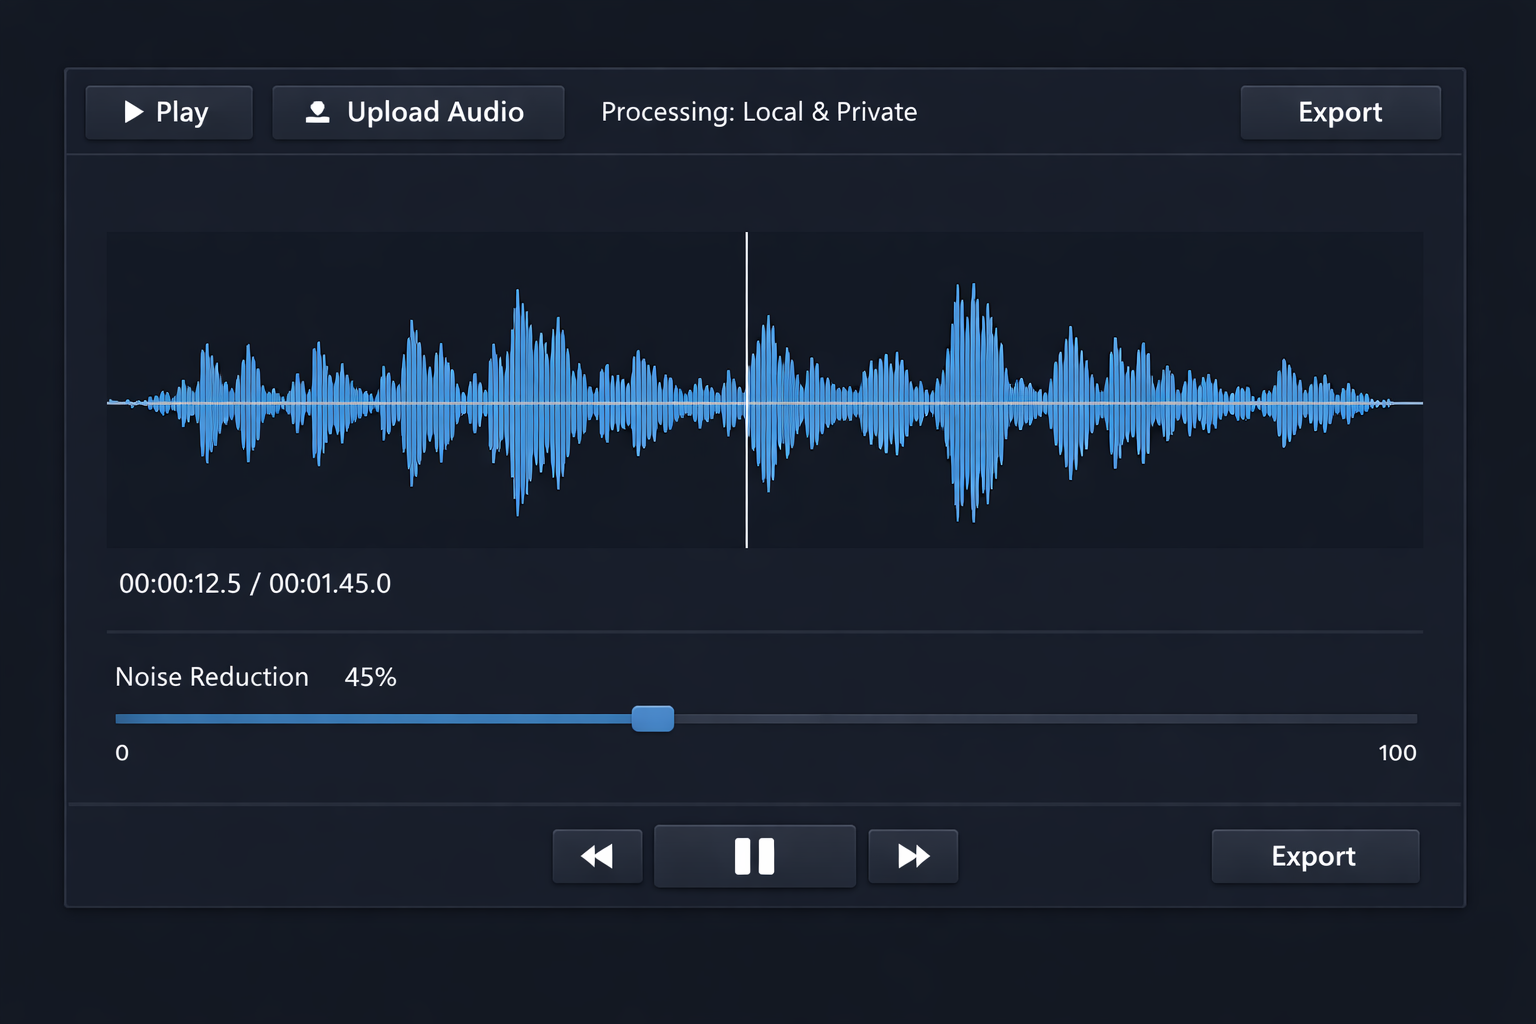
Step 2: Listen to the original audio
Before applying any processing, play the file to identify the type and intensity of the noise. Pay particular attention to the silent parts between speech — that is where the noise is most evident.
Step 3: Adjust the reduction level
Use the intensity slider to set how much reduction to apply. Start with values between 30% and 50% and listen to the result before increasing it. Excessive reduction can leave the audio sounding "metallic" or muffled — a problem just as serious as the original noise.
Step 4: View the spectrogram (optional)
The editor offers a spectrogram view, showing the audio frequencies over time. This makes it easy to visually identify where the noise is concentrated and adjust processing more accurately.
Step 5: Export the result
After applying the noise reduction, export the file in your preferred format. Use WAV or FLAC to retain the highest possible quality. If you need a smaller file, MP3 at 320kbps is a good option for distribution.
Advanced Tips for Better Results
Do not over-reduce
The most common mistake beginners make is turning the noise reduction up to maximum, thinking "more is better". In reality, excessive reduction ruins important voice frequencies and creates unpleasant digital artifacts. The goal is to reduce noise without compromising the signal.
Combine with equalization
Many noises are concentrated in specific frequency bands. Electrical hum, for instance, lives around 60Hz. After noise reduction, use the equalizer to apply a high-pass filteraround 80–100Hz and eliminate any residue in that region.
Use a Noise Gate for recordings with pauses
A Noise Gate is a processor that automatically mutes the audio when it drops below a certain volume. It is excellent for podcast recordings or voiceovers where there are natural pauses — during which any residual noise becomes very apparent.
Process in multiple light passes
Instead of a single pass with intense reduction, try two passes with moderate reduction. The result is usually significantly more natural and better preserves the voice's characteristics.
Preserve voice naturalness
After processing, play the audio paying special attention to fricative consonants like "s", "f", and "v". These frequencies are the first to degrade when noise reduction is excessive.
Complementary Processing Techniques
Noise reduction rarely works standalone as the only solution. Combining it with other tools produces much more professional results:
- Parametric Equalization: Allows tackling specific frequencies where the noise is concentrated. For example, if there is a 60Hz hum, you can create a narrow, precise cut exactly at that frequency without affecting the rest of the spectrum.
- Dynamic Compression: Compression reduces the difference in volume between the loudest and quietest parts of the recording. This makes background noise (which sits in the quietest parts) even less noticeable relative to the main voice.
- Noise Gate: As mentioned, a Noise Gate mutes audio during pauses, entirely eliminating noise in those silent windows. Configure the threshold carefully so as not to clip the beginning of words or sentences.
- Volume Normalization: After all processing, normalizing the file volume ensures it reaches the proper level for the destination platform. For podcasts, the recommended standard is -16 LUFS. For YouTube, -14 LUFS.
Prevention: The Best Strategy Against Noise
Post-production noise reduction is powerful, but it has limits. Recordings featuring very intense noise — where the useful signal blends significantly with the noise — might not be salvageable even with the best tools. For this reason, preventing is always better than fixing.
Choose the right microphone
For voice recordings (podcasts, voiceovers, video conferences), cardioid microphones are ideal because they capture sound primarily from the front and reject sound from the sides and back. USB models like the Blue Yeti or Audio-Technica AT2020 USBoffer great value for content creators.
Treat the acoustic environment
You do not need a professional studio. Thick carpets, heavy curtains, bookshelves filled with books, and acoustic foam in simple panels already make an enormous difference. Recording inside a wardrobe full of clothes is an economical and surprisingly effective solution.
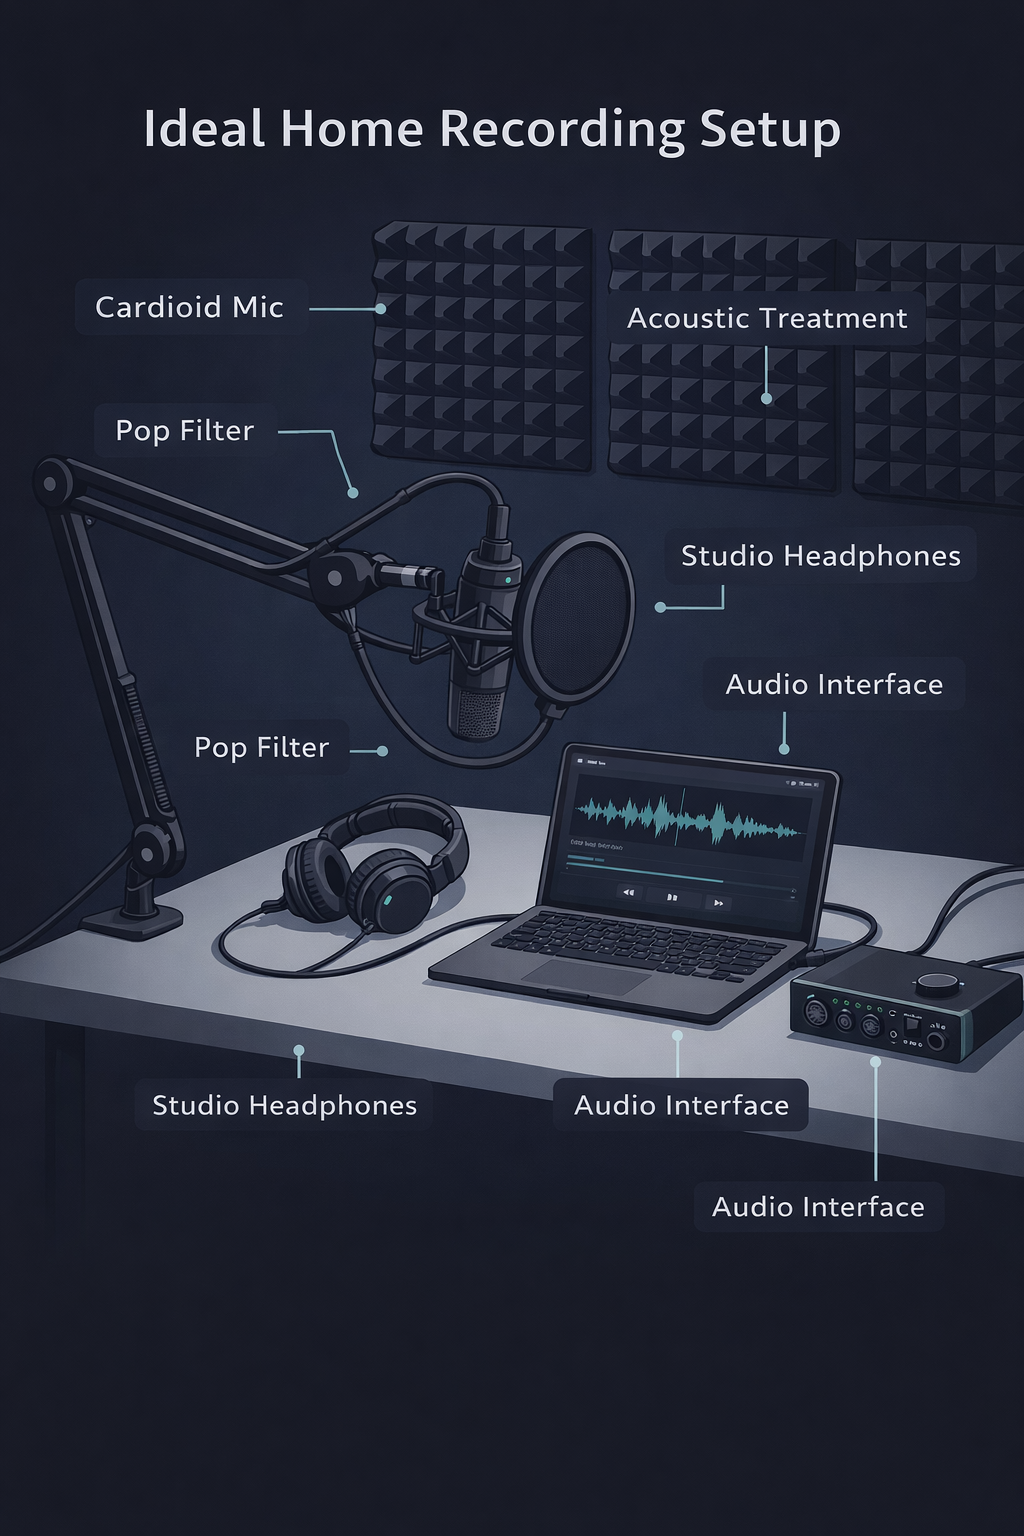
Turn off noise sources before recording
Air conditioning, fans, refrigerators, phone notifications — shut them all off before getting started. Inform whoever is sharing the space that you are about to record.
Set gain appropriately
Setting gain too high introduces amplification noise. Adjust your microphone volume so that your voice peaks around -12 dB to -6 dB on your editor's meter, leaving a safety margin without needlessly amplifying noise.
Use quality cables and connectors
Cheap cables are a frequent source of electrical interference. If you use an XLR microphone, invest in good quality balanced cables and keep them neatly separated from power cables.
Real Use Cases: When Noise Reduction Saves the Recording
- Beginner Podcasters: Most start recording in their own bedroom with a basic USB microphone. Background hiss is almost inevitable. Noise reduction transforms these recordings into professional-sounding content at no additional cost.
- Teachers and Online Course Creators: Lectures recorded during the day might capture outside sounds — cars, birds, construction. Cleaning the audio ensures students focus on the lesson, not the background disturbances.
- Journalists and Interviewers: Interviews held in cafes, events, or public spaces are full of environmental chatter. With noise reduction, seemingly unusable recordings can be recovered.
- Musicians and Independent Producers: Home studios rarely have professional soundproofing. Noise reduction helps to clean up acoustic instruments or vocal tracks recorded in domestic environments.
- Restoration of Old Audio: Cassette tapes, vinyl records, or old digital files frequently suffer from degradation noise. Noise reduction serves as a fundamental step in historical audio restoration.
Frequently Asked Questions (FAQ)
Does noise reduction work with video files?
Audio-Editor Online processes audio files. For videos, you can extract the audio, process the track, and later merge it back into the video using a video editor.
What is the best format to export after noise reduction?
To preserve maximum quality, use WAV (PCM 16-bit or 24-bit). For sharing and distribution, MP3 at 320kbps delivers good quality with a significantly reduced file size.
Does the tool work on mobile devices?
Yes. Audio-Editor Online is widely responsive and works on Android and iOS smartphone browsers, without installing any applications.
Can I use the tool freely?
Yes, noise reduction is available freely on Audio-Editor Online, presenting no usage limit or watermark on exported files.
Does noise reduction affect voice quality?
When applied moderately, it does not. The secret lies in setting proper reduction levels — typically ranging from 30% to 60% — and perpetually comparing the result with your original file before exporting.
Is the audio stored on any servers?
No. All processing happens entirely local on your browser. Your files are never sent nor copied to external servers, confirming total privacy guarantee.
Does the tool work cleanly with music?
Yes, but sparingly. In full musical mixes, noise reduction might affect instruments sharing ambient frequencies aligned with background hum. Use very conservative levels when editing musical recordings.
Conclusion
Audio noise reduction stands as one of the most impactful post-production techniques for any content creator, podcaster, musician, or video producer. Embracing the right tools — and applying the best practices you’ve absorbed comprehensively in this guide — it is remarkably achievable to upgrade amateur recordings into professional-tier audio excellence.
Remember these essential takeaways:
- Diagnose the type of noise thoroughly before diving into processing
- Introduce reductions gently to preserve absolute voice naturalness
- Compound with equalization and dynamic compression yielding the best comprehensive results
- Focus strongly on prevention at recording time as it systematically defeats fixing things in post
If you wish to test out these practices right away, give the noise reduction tool within Audio-Editor Online a shot — easily accessible freely with purely private processing entirely operated locally on your browser.
Do you harbor any questions concerning noise reduction, or care to share your personal editing experiences? Leave a comment beneath or reach out via our contact form.