Best Online Audio Editor & MP3 Editor: Complete Guide to Browser Editing 2026
Editing audio used to require heavy software, expensive licenses, and hours of learning. Programs like Adobe Audition, Pro Tools, or even Audacity — free, but complex — created a barrier to entry that kept content creators, podcasters, and beginner musicians from producing with professional quality. Audio-Editor Online is the free MP3 editor and audio editing tool that makes professional editing accessible to everyone — directly in the browser, with no account required.
That has changed. Today, it is possible to cut, normalize, equalize, remove noise, and export high-quality audio directly in the browser, without installing anything, creating an account, or paying a dime. Audio-Editor Online brings all these tools together in a simple interface accessible from any device.
In this complete guide, you will learn how to use every feature of the editor, which tools to use in each situation, comparisons with other market solutions, and everything you need to produce professional-quality audio — from scratch.
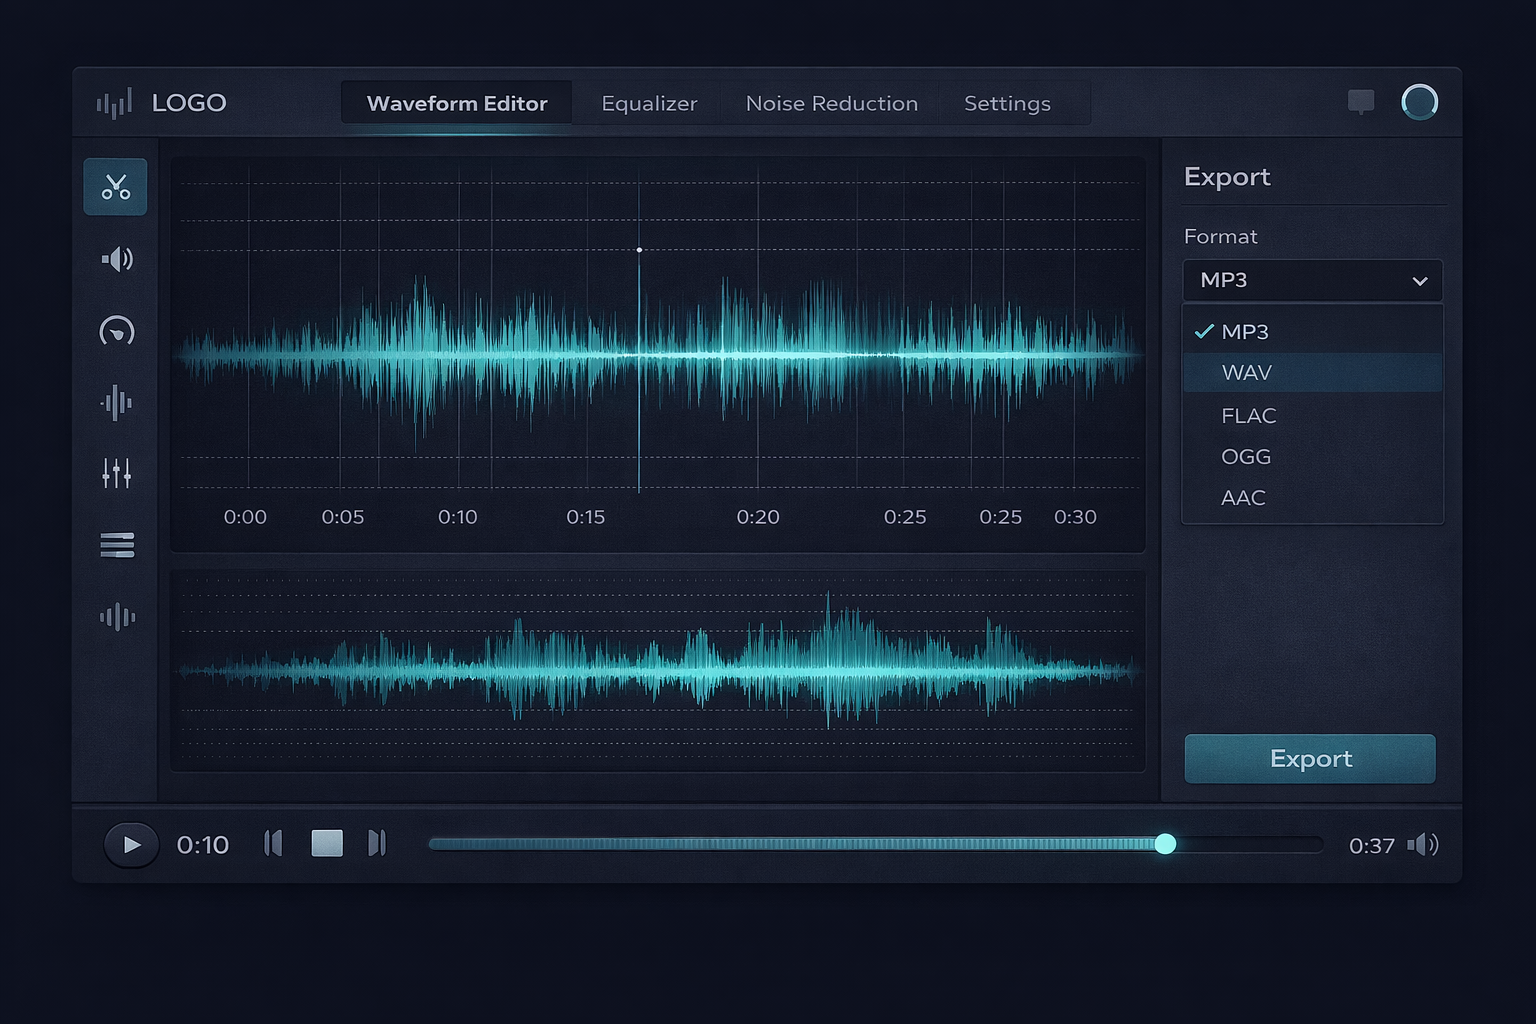
Table of Contents
- What Is Audio-Editor Online?
- Editor Interface: Understanding Each Element
- How to Use the Online Audio Editor: Complete Step-by-Step
- Complete Guide to Each Audio Editing Tool
- Exporting: Choosing the Right Format & Quality
- Detailed Use Cases
- Audio-Editor Online vs. Other Solutions
- Advanced Tips for Better Results
- Frequently Asked Questions (FAQ)
- Conclusion
What Is Audio-Editor Online? The Free MP3 Editor That Works in Your Browser
Audio-Editor Online is a browser-based audio editing platform — meaning all processing happens locally on your device, without sending your files to external servers. Your privacy is preserved by design, not by policy.
The tool was built to serve everyone from the content creator who needs to quickly trim a podcast clip to the producer who wants to apply a complete processing chain — noise reduction, equalization, compression, and normalization — before exporting in high quality.
What makes Audio-Editor Online different?
Most online audio editors require server uploads, impose file size limits, add watermarks to the output, or reserve the best features for paid plans. Audio-Editor Online does none of that:
- 100% local processing: your files never leave your device
- No watermarks: the exported file is completely clean
- No artificial limits: the limit is your device's memory
- No sign-up: access and use immediately
- No cost: all tools are free, with no premium plan
Supported formats
The editor accepts the most popular input formats and exports in multiple output formats:
| Format | Input | Output | Characteristic |
|---|---|---|---|
| MP3 | ✅ | ✅ | Lossy compression, universal use |
| WAV | ✅ | ✅ | Uncompressed, maximum quality |
| FLAC | ✅ | ✅ | Lossless compression, ideal for archiving |
| OGG | ✅ | ✅ | Open source, good compression |
| M4A | ✅ | ✅ | Apple format, excellent quality |
| AAC | ✅ | ❌ | Input supported |
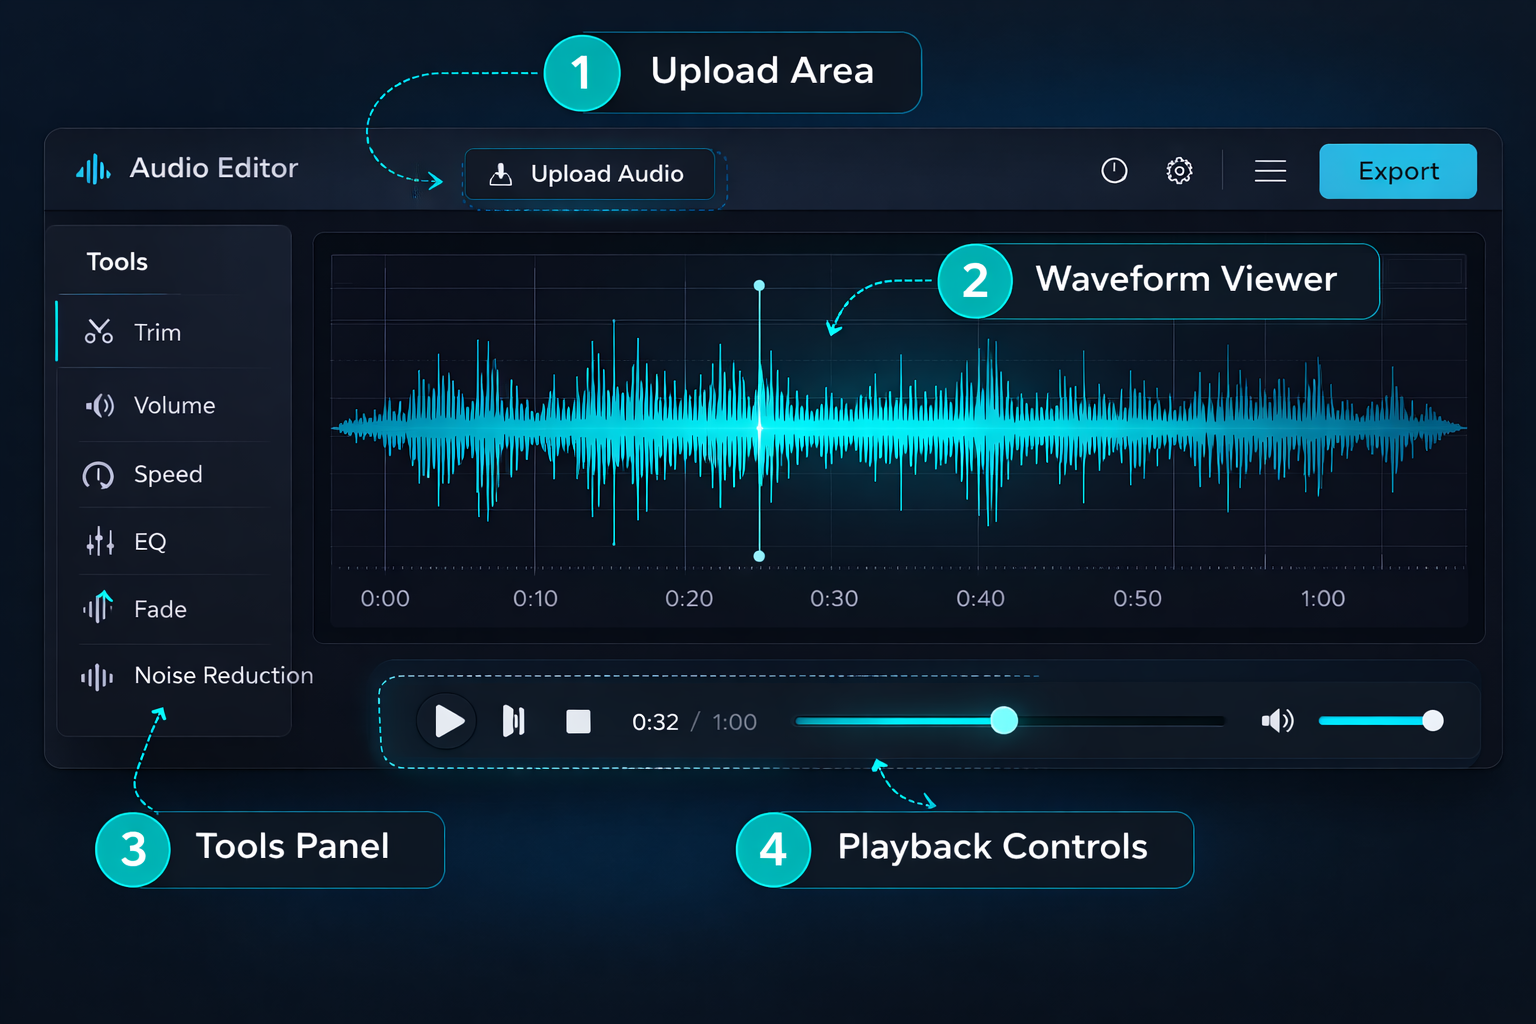
Editor Interface: Understanding Each Element
Before you start editing, it is helpful to understand the editor's main interface elements to navigate with confidence.
Upload Area
The initial screen features a central upload area where you can drag and drop an audio file or click to select from your device. After loading, the editor automatically displays the file's waveform.
Waveform Viewer
The heart of the editor. The waveform is the graphical representation of audio over time — where the signal is louder, the wave is taller; where it is quieter or silent, the wave is narrower. With it you can:
- Visually identify stretches of silence, noise, or volume spikes
- Select specific regions by clicking and dragging
- Navigate long files with precision
- See the impact of each edit in real time
Tool Panel
Organized in tabs, the tool panel groups all processing options. Each tab corresponds to an editing category: cut, volume, speed, equalization, effects, and export.
Playback Controls
Allow you to preview the result of any edit before exporting. They include play/pause, stop, current time indicator, and a navigable progress bar.
How to Use the Online Audio Editor: Complete Step-by-Step
Step 1: Upload your audio file
Go to the audio editor and upload your file using one of three methods:
- Drag and drop the file directly onto the upload area
- Click the upload area to select the file from your file manager
- Use the "Choose file" button on the top bar
The editor supports files up to your device's memory limit — files up to 200 MB generally work without issues on most modern computers and smartphones.
Step 2: Analyze the waveform
After loading, observe the waveform before making any edits. Identify:
- Unnecessary silence at the beginning or end
- Abnormal volume peaks (appear as spikes in the wave)
- Sections with constant background noise (wave with "noise" even during silences)
- Parts that need to be cut or removed
Step 3: Apply edits in the correct order
The order in which you apply tools affects the final result. The recommended sequence for most projects is:
- Cut — remove unnecessary sections first
- Noise reduction — clean the audio before processing
- Equalization — adjust the timbre of the clean audio
- Volume / Normalization — adjust the final level
- Fade in/out — add smooth transitions
- Export — choose format and quality
Step 4: Preview before exporting
Always use the playback button to listen to the result before exporting. Pay special attention to the sections you edited — it is much easier to correct before export than to reprocess afterward.
Step 5: Export in the correct format and quality
Choose the export format appropriate for the file's destination. See the export section below for platform-specific guidance.
Complete Guide to Each Audio Editing Tool
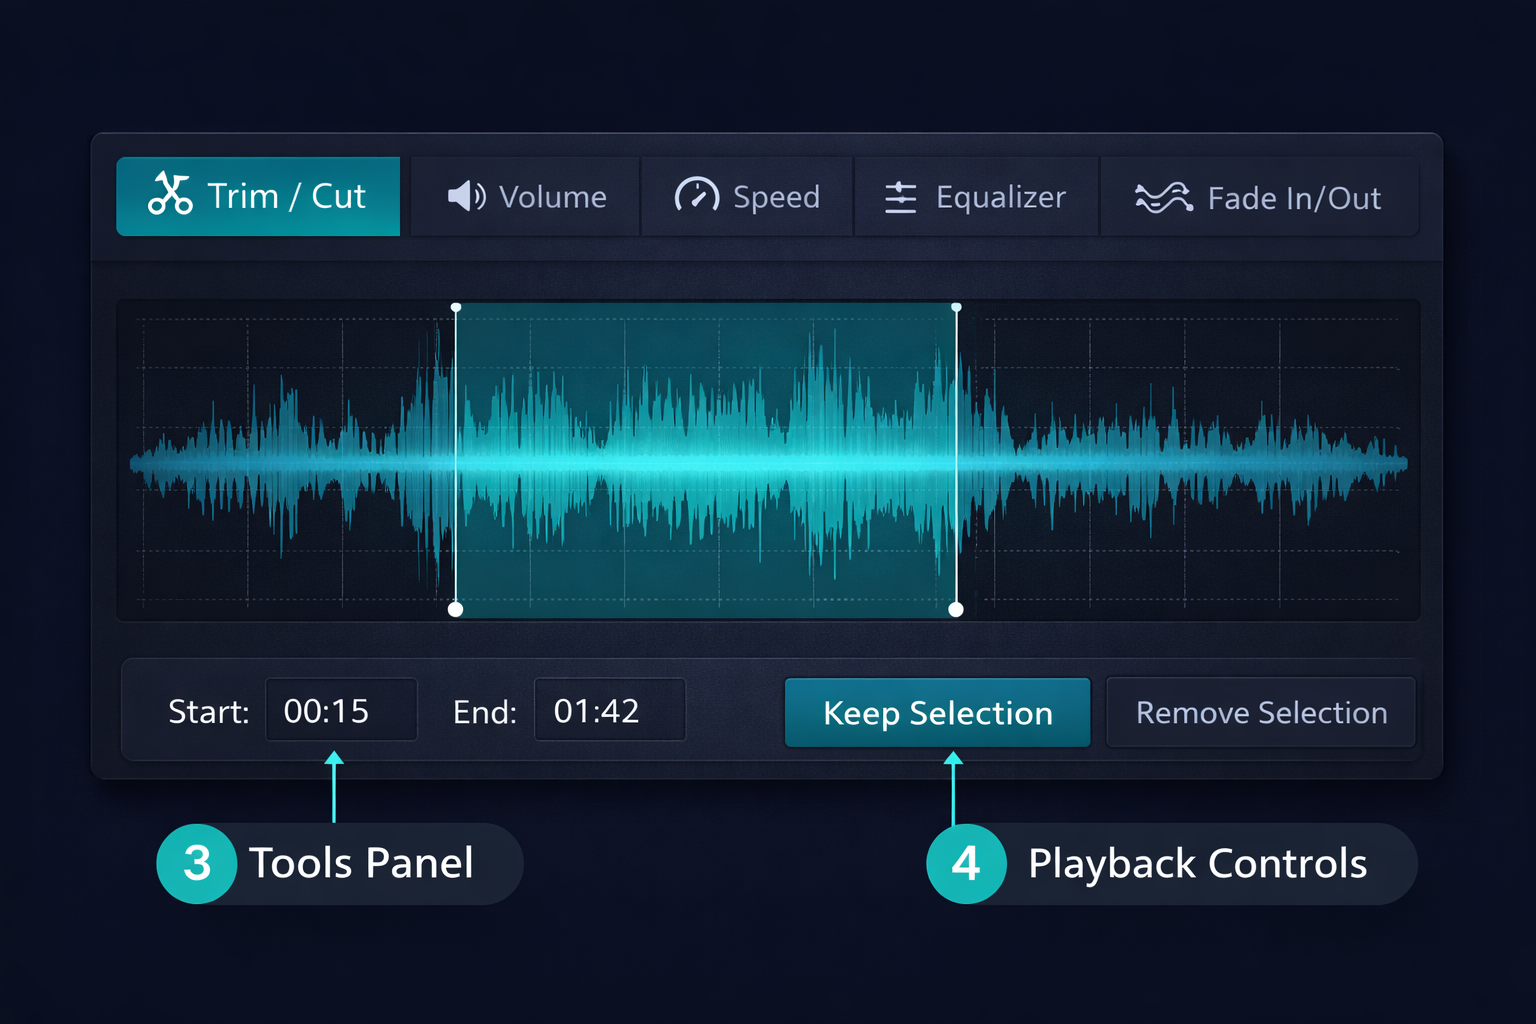
🔪 Cutting Tool (Trim / Crop)
The cutting tool lets you select a section of the waveform and remove everything outside the selection (crop) or remove the selected section (delete). It is the most basic and most used operation in audio editing.
How to use:
- Click and drag on the waveform to select the desired section
- Use "Keep selection" to crop (remove the rest) or "Remove selection" to delete only the marked section
- For precise selections, use the time fields to set exact start and end points
Ideal use cases:
- Remove long silence at the beginning or end of a recording
- Delete a speech error in the middle of a podcast
- Extract a specific section from a larger recording
- Remove point noises (cough, external noise)
🔊 Volume & Normalization Tool
Offers two complementary functions: amplification (manual gain adjustment in dB) and normalization (automatic adjustment to a target level).
Amplification: adjusts the volume of the entire file by a fixed amount. Use when you know exactly how much to adjust. Available range: –50 dB to +50 dB.
Normalization: analyzes the file and automatically adjusts so the peak level reaches the defined target. Ensures maximum possible volume without distortion.
For distribution on streaming platforms, use normalization with recommended targets: –14 LUFS for Spotify and YouTube, –16 LUFS for Apple Podcasts.
⚡ Speed Tool
Changes the playback speed from 0.5x (half speed) to 2x (double speed), without affecting pitch — the voice does not become high-pitched or deep, just faster or slower. This is technically called time-stretching.
Use cases:
- Shorten an audiobook or podcast without losing content
- Adjust narration duration to sync with a video
- Create sped-up versions of content for social media
- Slow down for analysis or transcription of rapid speech
🎛️ Equalization Tool
A 3-band equalizer (bass, mids, and treble) with ready-made presets for the most common use cases. For more precise control, use the advanced equalization tool available separately.
Available presets:
- Voice/Podcast: mid boost, bass cut below 80 Hz
- Bass Boost: boost at 60–100 Hz for more impact
- Brightness: treble boost for more clarity and presence
- Vocal: increased presence in the 2–4 kHz range
- Flat: no equalization, flat response
🌊 Fade In & Fade Out
Adds smooth volume transitions at the beginning (fade in) and end (fade out) of the audio. Without fade, audio starts and ends abruptly — which sounds unprofessional in most contexts.
Available settings: duration from 0.5 to 5 seconds for each fade, with linear or logarithmic curve.
Where to always use fade:
- At the beginning and end of podcast episodes
- In narrations and voice-overs for video
- In soundtracks and background music
- In recordings that start or end with noise
🔇 Noise Reduction
Removes hiss, hum, and constant background noise using spectral analysis. The algorithm identifies the noise pattern and subtracts it from the original signal, preserving the useful signal frequencies.
Recommended intensity: start with 30–50% and increase gradually. Reductions above 70% may create artificial audio artifacts.
For a detailed guide on noise reduction, see the article Audio Noise Reduction Online: The Complete Guide.
Exporting: Choosing the Right Format & Quality
Exporting is the final step and one of the most important. Choosing the wrong format and quality can compromise all the previous work.
Format guide by destination
| Destination | Recommended Format | Quality | Reason |
|---|---|---|---|
| Spotify / Apple Music | MP3 | 320 kbps | Industry standard for distribution |
| Apple Podcasts | MP3 | 192 kbps | Good quality, smaller file |
| Spotify Podcasts | MP3 | 192 kbps | Platform requirement |
| YouTube | MP3 or WAV | 320 kbps / lossless | YouTube recompresses internally |
| Archiving | WAV or FLAC | Lossless | Maximum quality preservation |
| Further editing | WAV | PCM 24-bit | Maintain quality for next edit |
| WhatsApp / social media | MP3 | 128 kbps | Smaller file size |
| Audible / ACX (audiobooks) | MP3 | 192 kbps | Platform technical requirement |
MP3 vs. WAV vs. FLAC: which to choose?
MP3 uses lossy compression — it removes parts of audio that the human ear theoretically does not perceive, resulting in much smaller files (about 10x smaller than WAV). At 320 kbps, the quality difference compared to WAV is imperceptible for most listeners on most playback systems. It is the ideal format for distribution.
WAV is the uncompressed audio format. It preserves 100% of the original information, but files are large. It is the correct format for archiving, sending to publishers or labels, and any project that will undergo further editing.
FLAC offers the best of both worlds: lossless compression — the file is smaller than WAV (about 50–60% of the size), but the quality is mathematically identical. It is the ideal format for archiving with space savings.
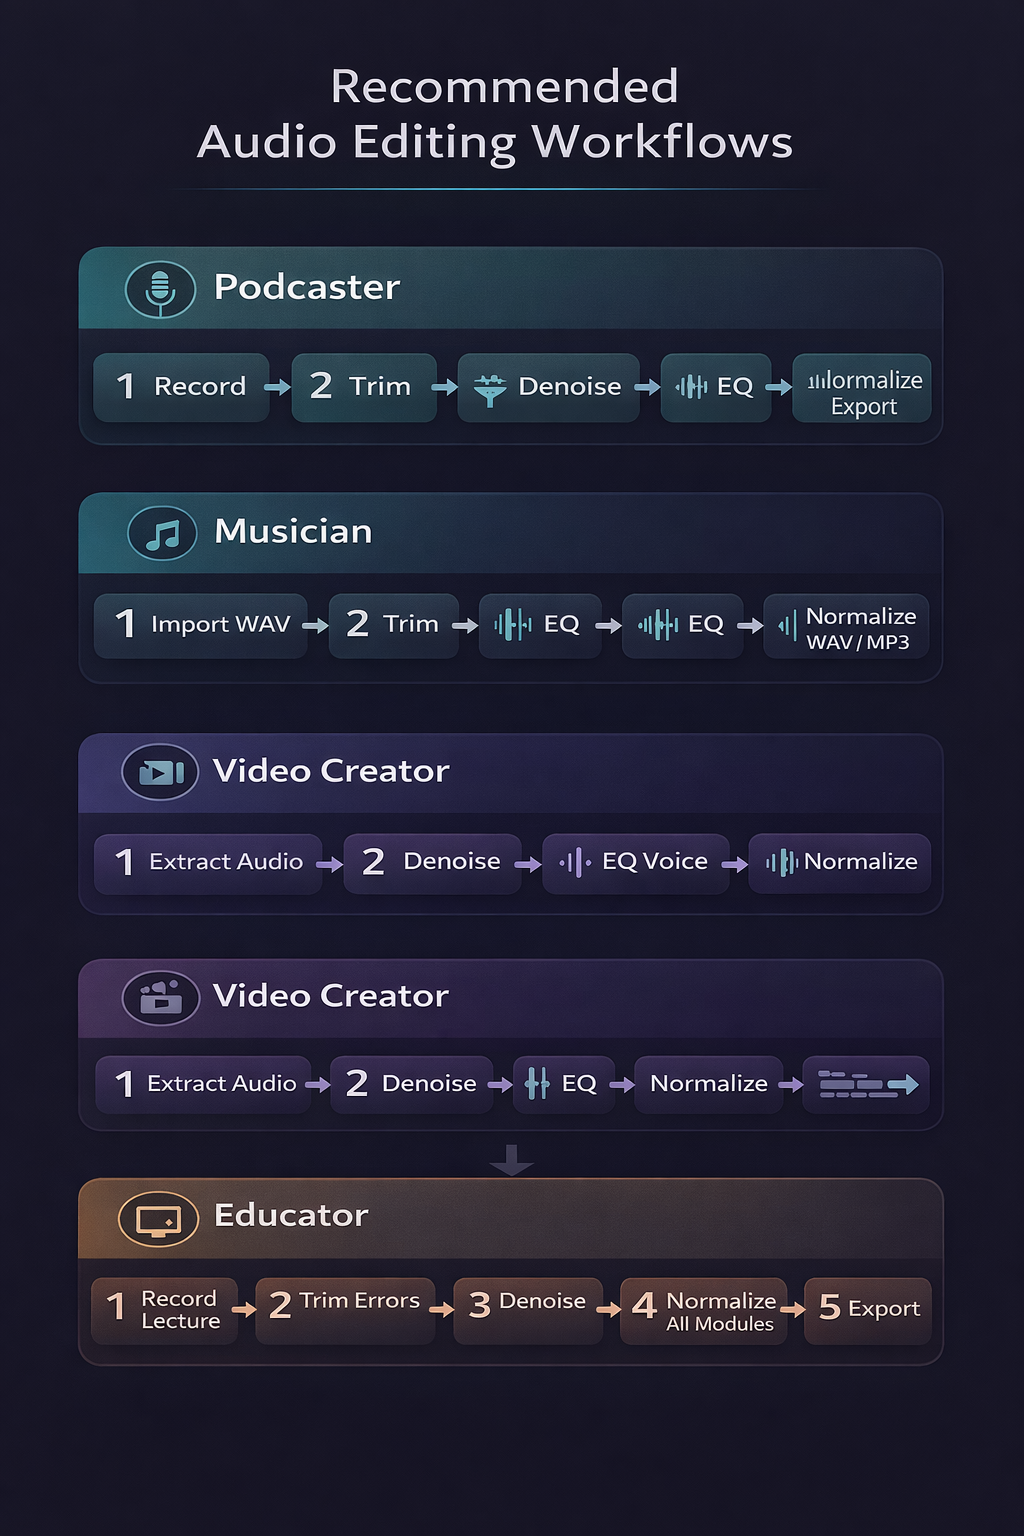
Detailed Use Cases
Podcasters: Complete Workflow
A typical podcast episode goes through the following stages in the editor:
- Load the raw recording (usually WAV from the audio interface)
- Cut silence at the beginning and end, speech errors, and long pauses
- Reduce noise to clean hiss and background noise
- Equalize with the "Voice/Podcast" preset and fine-tune the mids
- Normalize to –16 LUFS (Apple Podcasts) or –14 LUFS (Spotify)
- Add fade in (1–2 seconds) and fade out (2–3 seconds)
- Export as MP3 192 kbps for upload to platforms
With Audio-Editor Online, this entire workflow can be completed in a single browser session, without switching between different tools.
Independent Musicians: Preparing Demos
Home-recording musicians can use the editor to prepare demos before sending to labels or releasing on platforms:
- Load the recording (WAV from DAW or audio interface)
- Cut unnecessary silent intro or outro
- Equalize to correct tonal issues from the home recording
- Normalize to –14 LUFS (Spotify standard)
- Export as WAV for professional submission or MP3 320 kbps for digital demo
Video Content Creators
For those producing content for YouTube, Instagram, or TikTok, the typical flow is:
- Extract the audio from the video (using external conversion tools)
- Remove background noise captured during recording
- Equalize the voice for maximum clarity
- Adjust speed if needed for synchronization
- Normalize to –14 LUFS
- Export as MP3 320 kbps and reinsert into the video
Teachers & Online Educators
Class recordings, courses, and tutorials especially benefit from noise cleanup and consistent normalization:
- Cut speech errors, coughs, or unnecessary sections
- Reduce noise from the home recording environment
- Equalize for maximum voice intelligibility
- Normalize all modules to the same volume level
- Export in the format required by the course platform
Audio-Editor Online vs. Other Solutions
With so many options available, why choose Audio-Editor Online? The table below compares key features with the most popular alternatives:
| Feature | Audio-Editor Online | Audacity | Adobe Audition | Descript |
|---|---|---|---|---|
| Installation required | ❌ No | ✅ Yes | ✅ Yes | ✅ Yes |
| Local processing | ✅ Yes | ✅ Yes | ✅ Yes | ❌ Cloud |
| Free | ✅ 100% | ✅ Yes | ❌ Paid | ❌ Freemium |
| No watermark | ✅ Yes | ✅ Yes | ✅ Yes | ❌ Paid plan |
| Learning curve | 🟢 Low | 🔴 High | 🔴 High | 🟡 Medium |
| Works on mobile | ✅ Yes | ❌ No | ❌ No | ✅ Yes |
| No sign-up | ✅ Yes | ✅ Yes | ❌ Required | ❌ Required |
| Complete privacy | ✅ Yes | ✅ Yes | ❌ Adobe cloud | ❌ Cloud upload |
Audacity is the most powerful free alternative available, but requires installation, has a dated interface, and a significant learning curve. Adobe Audition is professional and powerful, but costs starting from $22/month. Descript is innovative, but sends your files to the cloud and charges for advanced features.
Audio-Editor Online occupies a unique space: free, no installation, with local processing and a simple interface — ideal for most practical audio editing needs without the complexity of professional tools.
Advanced Tips for Better Results
Always work with the highest quality input possible
The result of editing can never be better than the original file. If you have the option to work with WAV instead of MP3, always choose WAV. Editing MP3 and re-exporting as MP3 causes recompression and additional quality loss.
Use keyboard shortcuts to speed up your work
Familiarize yourself with the editor's shortcuts: spacebar for play/pause, Delete key to remove selection, Ctrl+Z to undo. These basic shortcuts can cut your editing time in half.
Maintain headroom in export if the file will undergo further editing
If the edited audio will be mixed with other elements (soundtrack, sound effects), export with headroom — normalize to –6 dBFS instead of –1 dBFS. This gives space for additional processing without clipping risk.
Make multiple saves in different formats
Always keep the original file untouched. Export intermediate versions in WAV before applying irreversible processing. Only convert to MP3 at the final definitive export.
Frequently Asked Questions (FAQ)
Does the editor work offline?
Yes. All processing happens locally in your browser. After loading the page, you can edit audio even without an internet connection — processing does not depend on server communication.
Are my files sent to any server?
No. All files are processed entirely on your device. No audio data is transmitted to Audio-Editor Online servers or third parties. Your privacy is preserved by architecture, not just by policy.
What is the maximum file size supported?
There is no fixed limit imposed by the tool. The practical limit is your device's available memory. On most modern computers and smartphones, files up to 200 MB are processed without issues.
Can I edit multiple files at the same time?
The editor processes one file at a time. For projects involving multiple tracks or joining different files, use the audio merge tool available separately on the site.
Does the editor work on mobile and tablet?
Yes. Audio-Editor Online is fully responsive and works on modern Android and iOS browsers. The interface adapts to screen size automatically, with no app installation required.
Can I undo edits?
Yes. The editor supports undo (Ctrl+Z / Cmd+Z) to reverse recent actions. For additional safety, we recommend keeping the original file as a separate copy before starting to edit.
Is there a quality difference between editing online and in desktop software?
For the operations available in Audio-Editor Online, there is no perceptible quality difference compared to desktop software like Audacity or Adobe Audition. Processing uses 64-bit floating point, the same standard used by professional tools.
Do I need an account to use it?
No. Audio-Editor Online is completely accessible without registration, login, or any type of account. Access, use, and leave — no traces, no tracking cookies, no forms.
Conclusion
Audio-Editor Online represents an evolution in the accessibility of professional audio production. What once required heavy software installation, expensive licenses, and hours of learning is now available for anyone with a modern browser — for free, privately, and without complications.
Whether you are a podcaster, musician, content creator, educator, or simply someone who needs to edit audio from time to time, the editor has all the tools you need for daily work: precise cutting, LUFS normalization, equalization, noise reduction, speed control, and multi-format export.
Remember the essential best practices:
- Always work with WAV during editing and export to MP3 only at the end
- Follow the correct processing order: cut → noise → EQ → volume → fade
- Normalize to the correct target for the destination platform
- Always preview before exporting
- Keep the original file untouched as backup
Whether you are looking for a free online audio editor for podcasts, an MP3 editor for music production, or simply an audio cutter to trim a recording — Audio-Editor Online covers every use case with professional-grade tools, no subscription, and no file uploads to external servers.
Access the online audio editor now and start editing with professional quality — no installation, no cost, no complications.
Have questions about the editor or want to share your experience? Reach out via our contact form.