How to Equalize Audio Online: Complete Professional Equalization Guide 2026
Have you ever heard two recordings made with the same microphone, in the same room, and noticed one sounded clear and professional while the other sounded muffled or harsh? The difference is almost always equalization.
Audio equalization — or simply EQ — is the technique of adjusting the balance between the different frequencies of a sound. It is one of the most powerful tools in audio production, used by sound engineers, podcasters, musicians, and content creators worldwide to transform ordinary recordings into professional-quality audio.
In this complete guide, you will learn what equalization is, how frequencies work, which adjustments to make for each type of content, and how to apply it all for free, right in your browser, without installing any software.
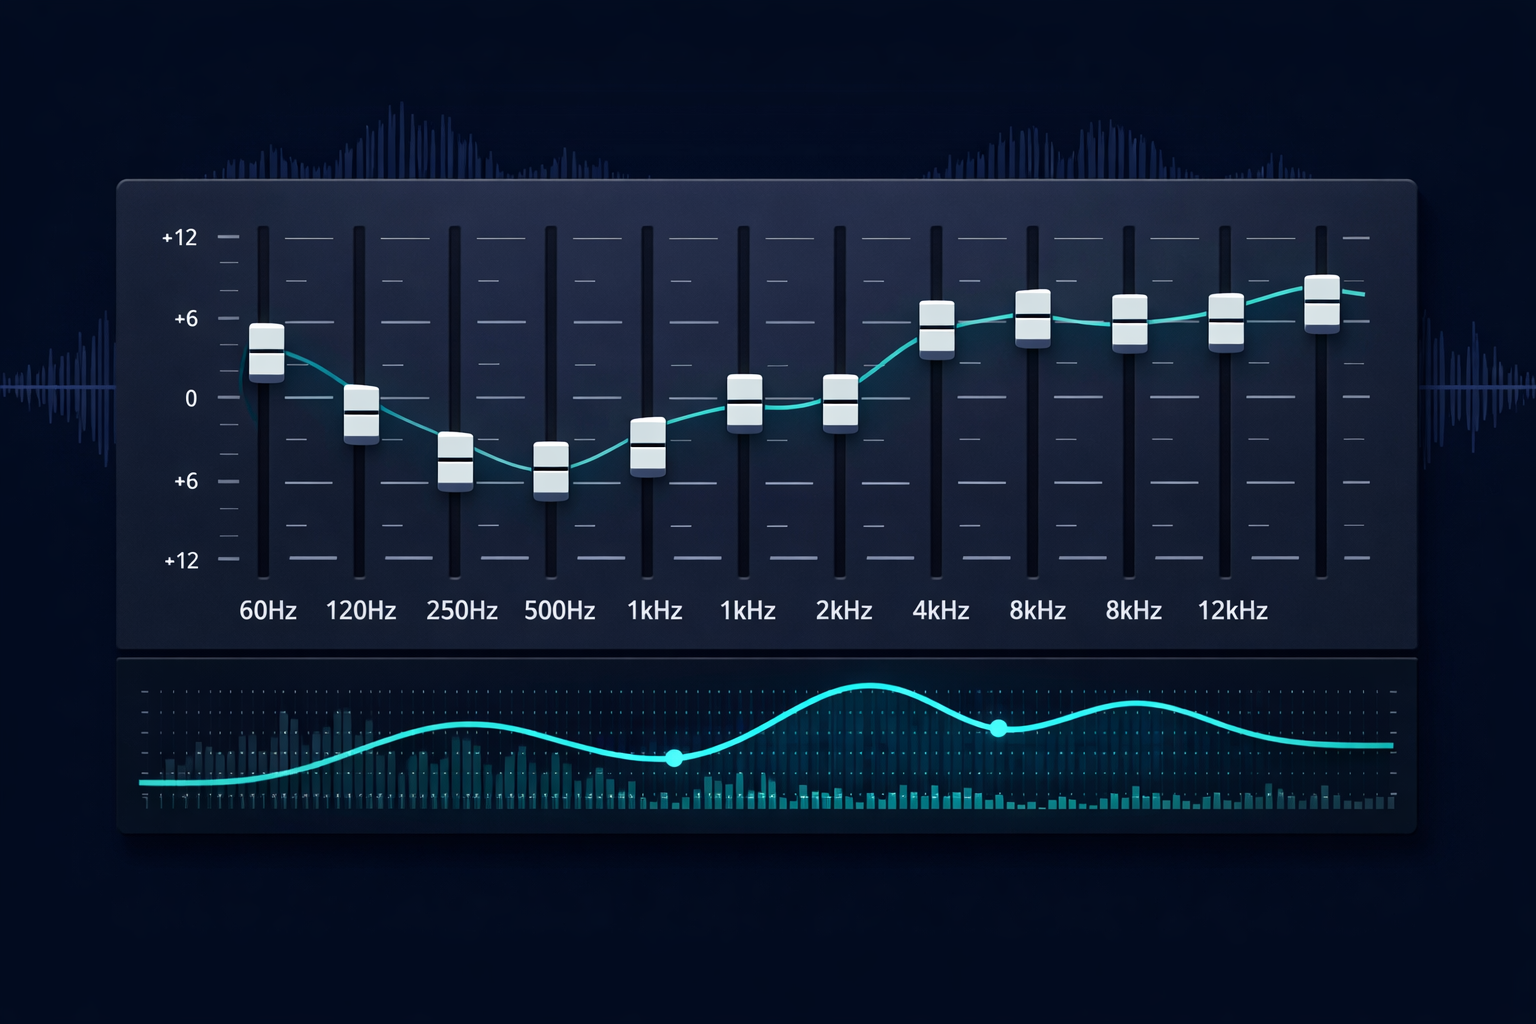
Table of Contents
- What Is Audio Equalization?
- Understanding the Frequency Spectrum
- Types of Equalizers
- How to Equalize Audio Online: Step-by-Step
- EQ Presets by Content Type
- Advanced Equalization Techniques
- Common Problems & How to Fix Them with EQ
- The Golden Rule of Equalization
- EQ for Different Distribution Platforms
- Frequently Asked Questions (FAQ)
- Conclusion
What Is Audio Equalization?
Audio equalization is the process of increasing or decreasing the intensity of specific frequency bands in a sound signal. Instead of adjusting the overall volume — which affects all frequencies equally — the equalizer lets you work on specific regions of the sonic spectrum independently.
Think of the audio frequency spectrum as a color palette. Overall volume would be screen brightness — turning everything up or down together. Equalization would be the ability to adjust each color individually: make the blue more vivid, the red softer, the yellow more intense — without affecting the other colors.
In practice, this means you can:
- Reduce the low-frequency hum of a microphone without affecting vocal clarity
- Enhance vocal presence without making the treble harsh
- Remove the mid-frequency "blur" that makes audio sound muddy
- Add body and warmth to a recording that sounds thin or artificial
The equalizer is such a fundamental tool in audio production that it is virtually impossible to find a professional music project, podcast, or soundtrack that has not undergone some form of equalization.
Understanding the Frequency Spectrum
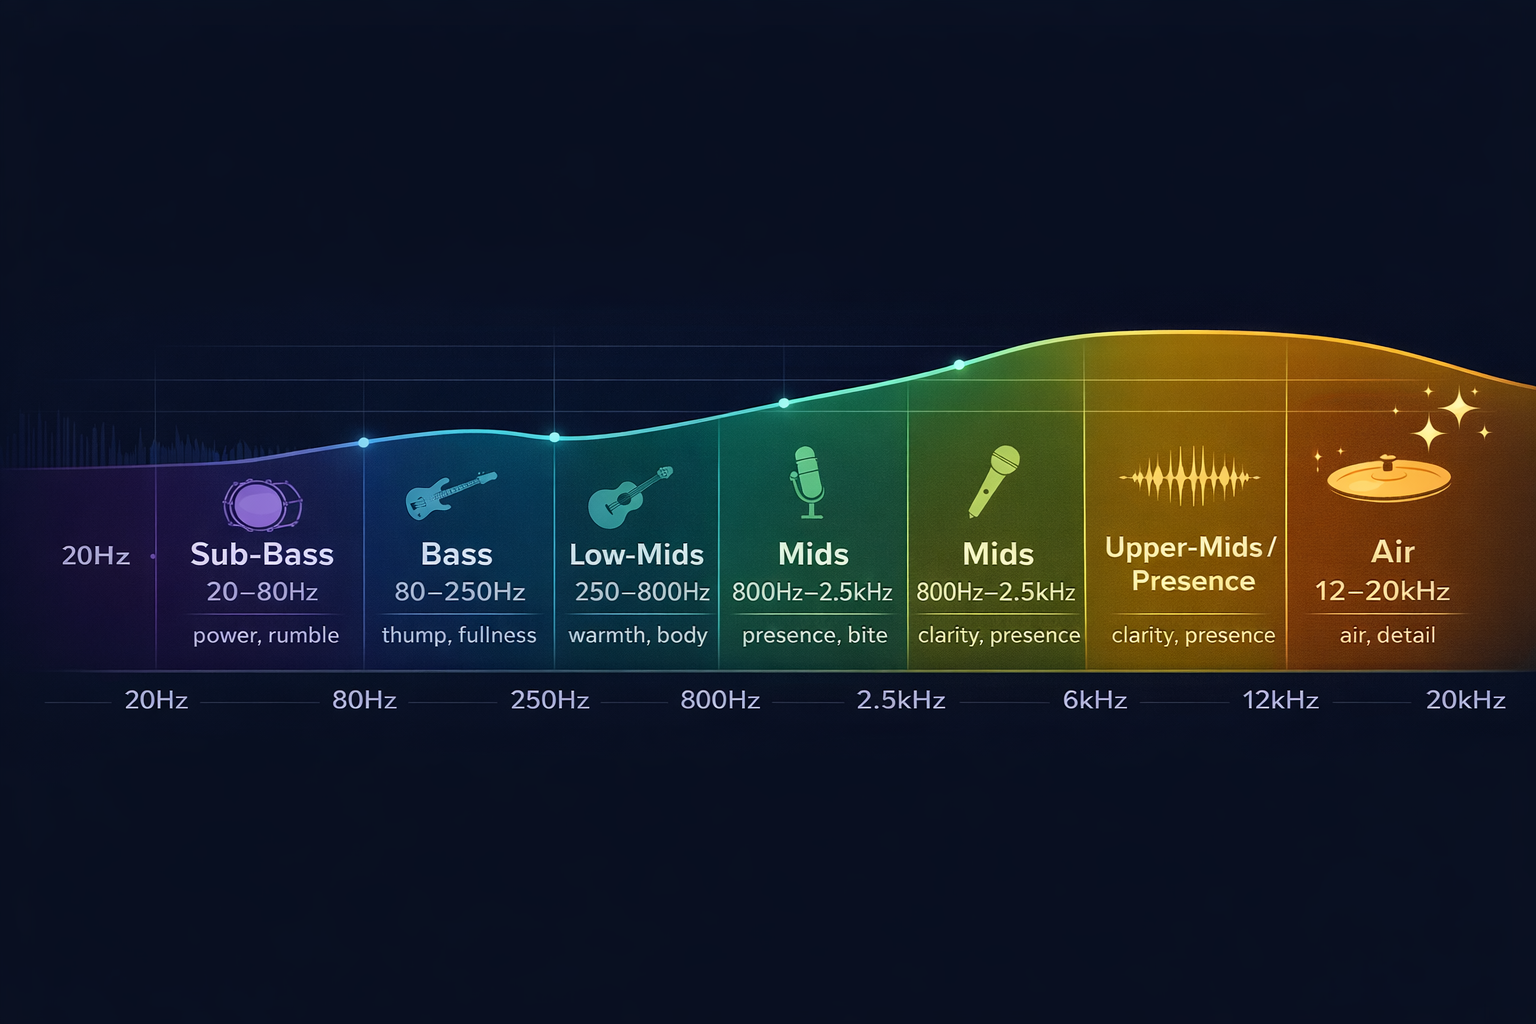
To equalize well, you need to understand what happens in each region of the sonic spectrum. The human ear perceives frequencies between approximately 20 Hz and 20,000 Hz (20 kHz). Each region has its own sonic characteristics and impacts audio in very different ways.
Sub-Bass (20 Hz – 80 Hz)
The lowest region of the spectrum, responsible for the sensation of "weight" and physical "impact" in sound — that vibration you feel more than hear. In music, this is where the deep kick drum and the lowest bass notes live. In voice recordings, this region rarely contains useful information and frequently carries environmental vibration noise (air conditioning, traffic, footsteps). For most voice and podcast recordings, it is recommended to cut everything below 80 Hz with a high-pass filter.
Bass (80 Hz – 250 Hz)
The region of "musical" bass: kick body, bass notes, guitar and piano fundamentals. In voice, this region determines the "warmth" and "thickness" of the timbre. Excess here causes the "muddy" or "dirty" sound — frequencies blend together and clarity drops. Too little causes a "thin" or "lean" voice. This is one of the regions that demands the most attention when equalizing podcasts and narrations.
Low-Mids (250 Hz – 800 Hz)
A delicate region. In excess, it creates a "boxy," "closed," or "nasal" sound — as if the voice were inside a cardboard box. Subtle cuts in this region (especially between 300 Hz and 500 Hz) often open up the audio and dramatically improve clarity without needing to touch anything else.
Mids (800 Hz – 2.5 kHz)
The heart of vocal intelligibility. This is where most consonants and the presence of the human voice live. Careful boosts between 1 kHz and 2 kHz increase clarity and help the voice "cut through" a mix. Too much, however, makes the sound metallic and fatiguing.
Upper-Mids / Presence (2.5 kHz – 6 kHz)
The presence region: where the voice gains definition and "focus." Boosts here make the voice sound closer and clearer. This is also where sibilance lives — the excessive "sss" sound that appears in some voices. Precise cuts between 4 kHz and 6 kHz can reduce sibilance without compromising overall clarity.
Treble / Brilliance (6 kHz – 12 kHz)
Brightness, air, and detail. A touch of boost in this region (especially above 8 kHz) opens up the audio and gives a sense of "professionalism" and "space." Too much makes the sound harsh and fatiguing. This is the region of cymbal crashes, vocal fricatives, and upper harmonics of instruments.
Ultra-High / Air (12 kHz – 20 kHz)
The region of "air" — frequencies so high they are barely perceived consciously, but contribute to a sense of openness and naturalness. In voice recordings, a gentle boost above 12 kHz with a shelf filter can add that "professional studio" feel without excess.
Types of Equalizers
Different equalizer types exist, each with specific characteristics and use cases. Understanding the differences helps you choose the right tool for each situation.
Graphic Equalizer (Graphic EQ)
The most visual and intuitive type. It presents a series of fixed frequency bands (usually 10 or 31 bands), each with a vertical slider. You adjust the gain of each band up (boost) or down (cut). Easy to use and great for general, quick adjustments.
Ideal for: beginners, quick tonal adjustments, sound presets.
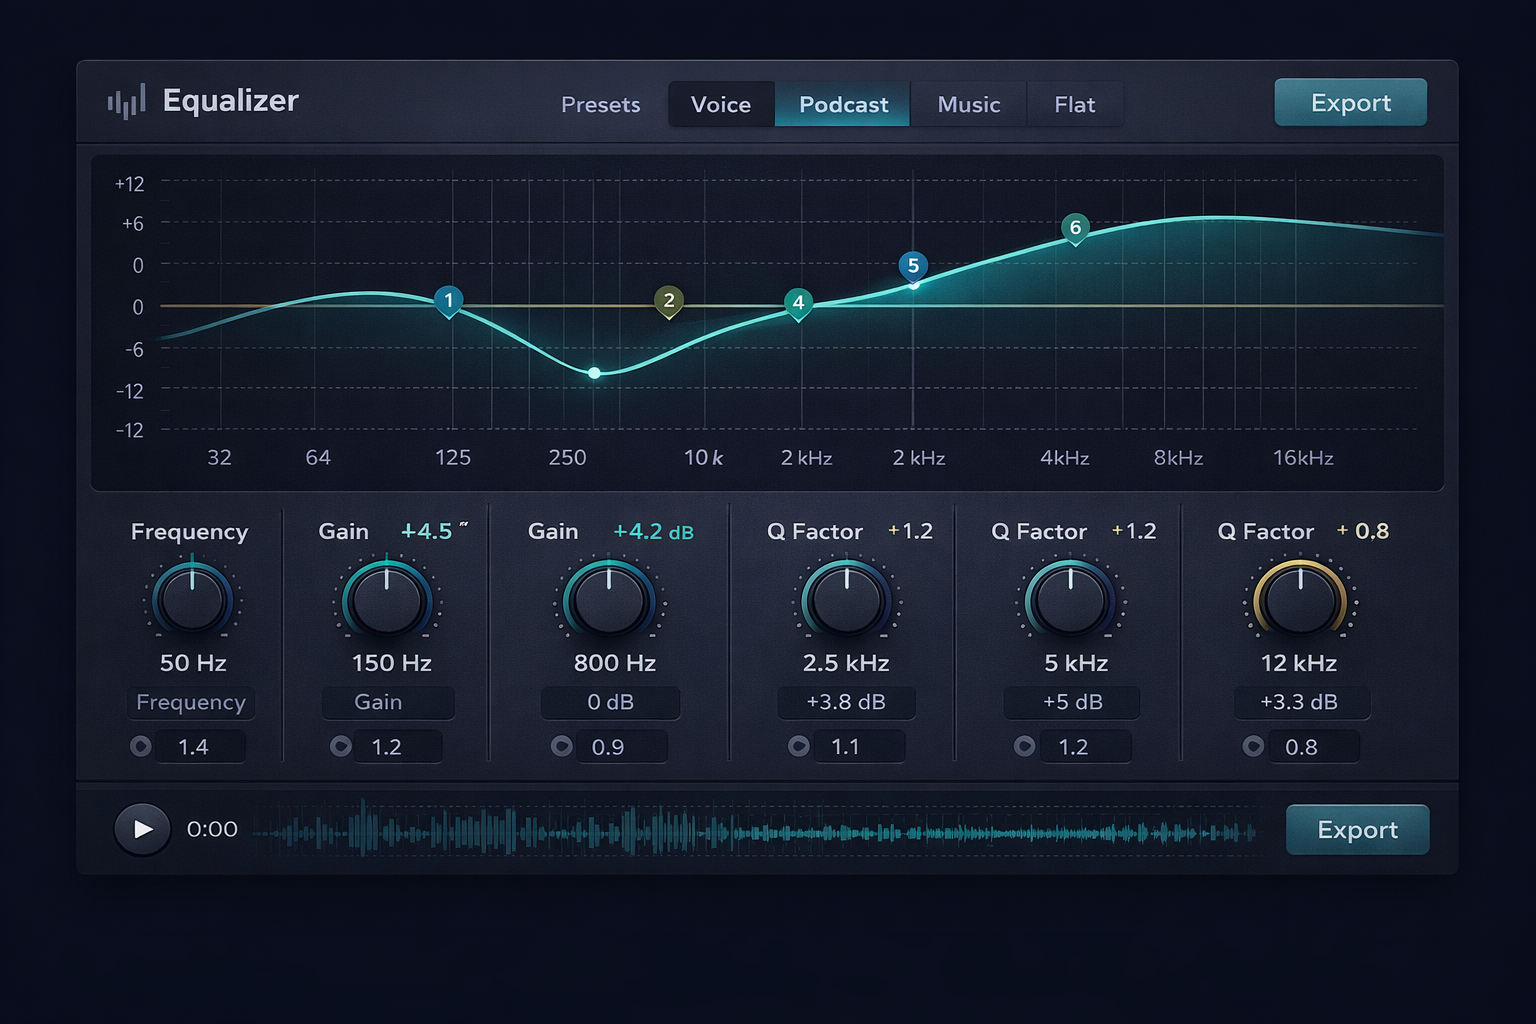
Parametric Equalizer (Parametric EQ)
The most powerful and precise type. Each band has three independent parameters: frequency (where to act), gain (how much to boost or cut), and Q (bandwidth — how precise or broad the adjustment is). A parametric EQ with 4 to 8 bands offers near-surgical control over the spectrum.
Ideal for: fixing specific problems, professional production, voice treatment.
Shelving Equalizer
Operates on an open range — boosts or cuts all frequencies above (high shelf) or below (low shelf) a cutoff point. The low shelf is perfect for adding or removing body in the bass. The high shelf is excellent for adding brightness and air in the treble.
Ideal for: general tonal adjustments, adding warmth or brightness.
High-Pass Filter (HPF)
Passes only frequencies above a cutoff point, eliminating everything below. One of the most used tools in voice production — applying an HPF at 80 Hz or 100 Hz removes background rumble, air conditioning vibration, and low-frequency noise without affecting the voice.
Ideal for: cleaning unwanted bass from voice recordings.
How to Equalize Audio Online: Step-by-Step
With Audio-Editor Online, you have access to a complete professional equalizer right in your browser — no installation, no account required, with 100% local and private processing.
Step 1: Upload your audio file
Go to the equalization tool and upload your file. Supported formats include MP3, WAV, FLAC, OGG, and M4A. The file is processed locally in your browser — never sent to external servers.
Step 2: Listen to the original audio carefully
Before touching any parameter, listen to the entire file and try to identify the problems. Ask the right questions:
- Does the audio sound "muddy" or "dirty"? → Problem in the low-mids (250–500 Hz)
- Does the voice sound muffled or lack presence? → Missing mids (1–3 kHz)
- Is there excessive sibilance? → Too much energy at 4–6 kHz
- Does the audio sound "thin" or lack body? → Missing bass (100–200 Hz)
- Is there a hum or rumble in the background? → Excess sub-bass (below 80 Hz)
Step 3: Apply a preset as a starting point
If you are just starting out, use one of the available presets as a starting point — Voice, Podcast, Music, Narration. The presets are built with settings that work well for most cases and serve as a foundation for fine-tuning.
Step 4: Make manual adjustments with moderation
With the preset applied, listen again and identify what still needs adjustment. Use the ±3 dB rule: start with small adjustments and increase gradually. It is much easier to add progressively than to correct after overdoing it.
Step 5: Compare with the original
Use the toggle button between the original and equalized audio. Listen to the same section with and without equalization to make sure the result is better — and not just "different." Our ears adapt quickly, so direct comparison is essential.
Step 6: Export the result
After confirming the result, export as WAV (PCM 24-bit) for maximum quality, or MP3 at 320 kbps for digital distribution.
EQ Presets by Content Type
The table below gathers the most commonly used equalization settings for each content type. Use as a reference and adapt to your specific material.
| Content Type | HPF | Cuts | Boosts | Goal |
|---|---|---|---|---|
| Voice / Podcast | 80–100 Hz | 300–500 Hz (–2 to –4 dB) | 1–3 kHz (+2 dB) | Clarity and presence |
| Narration / Audiobook | 100 Hz | 400 Hz (–3 dB) | 2 kHz (+2 dB), 10 kHz (+1 dB) | Intelligibility and lightness |
| Interview (field) | 120 Hz | 200–400 Hz (–3 dB) | 1–2 kHz (+3 dB) | Cut noise, preserve voice |
| Pop/Rock Music | 40 Hz | 350 Hz (–2 dB) | 80 Hz (+2 dB), 10 kHz (+2 dB) | Punch and brilliance |
| Classical Music | 30 Hz | — | 8–12 kHz (+1 dB) | Naturalness and air |
| Video Conference | 100 Hz | 300 Hz (–3 dB), 5 kHz (–2 dB) | 1.5 kHz (+2 dB) | Maximum intelligibility |
| Old Audio Restoration | 80 Hz | 200 Hz (–4 dB), 6 kHz (–3 dB) | 1–2 kHz (+3 dB) | Historical clarity |
Advanced Equalization Techniques
Subtractive vs. Additive EQ
There are two main equalization philosophies. Subtractive EQ focuses on identifying and cutting problematic frequencies, leaving the sound cleaner and more natural. Additive EQ focuses on boosting desired frequencies to shape the timbre. The professional approach is always to start subtractive — remove what is getting in the way — before adding what is missing. Cutting is more efficient and produces more natural results than compensating for problems with boosts.
Dynamic EQ (Automation)
In more elaborate productions, equalization can vary over time — increasing vocal presence at the most important moments of speech and pulling back during pauses. This technique, called EQ automation, is common in professional radio and audiobook productions.
M/S (Mid-Side) Equalization
An advanced technique that separates the signal into two components: the center (Mid) and the sides (Side). This allows you to equalize the center voice differently from the surrounding ambient sounds and instruments. It is a powerful mastering tool, but requires specialized software.
Filtering Problem Frequencies with Narrow Q
When a specific frequency is causing a problem — such as a hum at 60 Hz or a resonance at 400 Hz — the correct approach is to use a filter with a very narrow Q (high Q value) and make a deep, precise cut at only that frequency. This eliminates the problem without affecting the rest of the spectrum.
Common Problems & How to Fix Them with EQ
"The audio sounds muddy or dirty"
Most common cause: energy buildup in the 200–400 Hz region, especially in recordings made in small rooms or with low-quality microphones. Solution: apply cuts of –2 to –4 dB between 250 Hz and 500 Hz. Start at 300 Hz and move the frequency while listening to identify the exact problem point.
"The voice lacks presence, sounds distant"
Most common cause: lack of energy in the 1–3 kHz region, where vocal presence and consonant intelligibility live. Solution: gentle boost of +2 to +3 dB between 1.5 kHz and 2.5 kHz. If the voice still sounds distant after the boost, check if excess reverb or noise is competing with it.
"The audio sounds harsh or fatiguing"
Most common cause: excess in the 3–6 kHz region, especially in microphones with a built-in presence boost. Solution: gentle cut of –2 to –3 dB between 4 kHz and 6 kHz. If there is specific sibilance on "sss" sounds, use a de-esser or a very narrow cut around 6–8 kHz.
"The audio sounds thin or lacks body"
Most common cause: recording with little bass content, or excessive bass cut during capture. Solution: boost of +2 to +3 dB between 100 Hz and 200 Hz to add body. Be careful not to overdo it — excess in this region creates the opposite problem (muddiness).
"There is a constant hum in the background"
Most common cause: electrical interference at 50 Hz or 60 Hz (depending on the local power grid). Solution: apply a notch filter (very narrow cut with high Q) at exactly 60 Hz. If the hum has harmonics (120 Hz, 180 Hz), apply additional filters at those frequencies.

The Golden Rule of Equalization
If there is a single principle that separates amateur equalization from professional, it is this: cut, don't boost.
When something is wrong with the audio, the natural tendency is to try to "fix" it by adding — more bass, more presence, more brightness. But in most cases, the problem is not the lack of something: it is the excess of something else.
Audio that sounds "without presence" rarely needs more mids. Most of the time, it needs less low-mids (which are "muffling" the presence). Audio that sounds "without brightness" often does not need more treble — it needs less mids competing with the upper harmonics.
When you boost a frequency, you also change the relationship with all other frequencies — which often creates new problems. When you cut, you reveal what was already there but was being masked.
The practice recommended is:
- Identify the problematic frequency
- Make a cut in that region
- Listen to the result
- Only add a boost if the cut is not enough
Over time, you will notice that most of your mixes will need far more cuts than boosts.
EQ for Different Distribution Platforms
The platform where the audio will be played also influences how you should equalize. This is because different playback systems — headphones, speakers, phone speakers, home theater systems — have very different frequency responses.
For podcasts (headphones): Most podcast listeners use headphones. Headphones tend to have a flatter response and reveal more detail in the mid frequencies. EQ for headphones can be slightly more gentle in the mids than for speakers.
For YouTube (speakers and phones): Video audio is played on highly varied devices. The common denominator is ensuring the voice is intelligible even on small phone speakers — which means prioritizing clarity in the 1–3 kHz region above all else.
For music streaming (hi-fi systems): High-fidelity systems reveal every spectral detail. Equalization needs to be more careful and subtle, without excess in any range.
For live streaming: Live streaming environments often compress audio additionally. Equalizing with a bit more presence in the upper-mids compensates for this loss and maintains intelligibility after the platform's compression.

Frequently Asked Questions (FAQ)
What does Q mean on a parametric equalizer?
Q is the quality factor of the band — it determines the width of the frequency range affected by the adjustment. A low Q (0.5 to 1) creates a wide curve that affects a large region of the spectrum, ideal for general tonal adjustments. A high Q (5 to 10) creates a narrow, precise curve, ideal for correcting specific problems like hums or resonances.
Does equalization destroy the original audio quality?
When done inside the editor (using floating-point digital processing), equalization does not degrade the quality of the original file. The quality risk lies in export — especially if you export to MP3 after editing an MP3, causing recompression. To avoid this, always work with WAV or FLAC and export to the final format only once.
What is the difference between an equalizer and a filter?
In practice, filters are specific cases of equalization. A high-pass filter (HPF) is an EQ with infinite attenuation below a frequency. A notch filter is an EQ with a very deep and narrow cut at a specific frequency. Every filter is technically an equalizer, but not every equalizer is called a filter.
Do I need professional headphones to equalize?
Professional headphones with a flat frequency response (like reference models from Sennheiser, AKG, or Sony) help you hear audio more neutrally and reveal problems that consumer headphones may mask. However, with practice, you can equalize well with any reasonably quality pair — the most important thing is to know the characteristics of your equipment and always compare with references.
Should I equalize before or after noise reduction?
The recommended order is: first reduce noise, then equalize. Noise reduction intelligently removes unwanted frequencies, and subsequent equalization refines the timbre of the already clean signal. Equalizing before noise reduction can amplify the noise along with the useful signal.
Can I use equalization to fix a clipped recording?
No. Clipping (distortion from exceeding 0 dBFS) irreversibly destroys information. Equalization cannot recover what was lost. It may help slightly soften the impact of clipping in very mild cases, but it is not a real solution for this problem.
Does the tool work on mobile and tablet?
Yes. Audio-Editor Online is fully responsive and works on modern Android and iOS browsers, with no app installation required. EQ processing happens locally on the device.
How many EQ bands are needed for a good result?
For most practical applications — podcasts, narrations, interviews — 4 to 6 parametric EQ bands are more than sufficient. 31-band graphic equalizers offer more visual control, but the precision of a 4-band parametric surpasses any graphic EQ for correcting specific problems.
Conclusion
Equalization is both a technique and an art. On the technical side, it is the precise application of cuts and boosts at specific frequencies to solve acoustic problems and improve audio clarity. On the artistic side, it is the ability to shape the timbre and sonic personality of a recording to convey exactly the feeling you want.
With the understanding of spectral regions, the types of equalizers available, and the best practices presented in this guide, you have everything you need to start equalizing with professional results — regardless of your experience level.
Remember the essential principles:
- Cut before boosting — removing what gets in the way is more efficient
- Start with subtle adjustments — ±3 dB already makes a big difference
- Always compare with the original — our ears adapt quickly
- Equalize for the target platform — headphones, speakers, and phones respond differently
- Use HPF on voice recordings — cutting below 80–100 Hz cleans up audio at no cost
Try the equalizer on Audio-Editor Online right now — free, right in your browser, no installation required, with 100% private processing on your own device.
Have questions about equalization or want to share your experience? Reach out via our contact form.