How to Cut Audio Online with Precise Edits
Cutting audio is the most fundamental operation in all sound editing. Before equalization, normalization, or any effects, you need the right material — free of unnecessary silences, speech errors, and unwanted segments that clutter the final recording.
It sounds simple, but cutting audio with professional precision requires understanding the waveform, knowing where to cut without creating clicks or artifacts, and mastering the different selection and removal techniques. Done incorrectly, a poorly positioned cut can ruin a transition, clip the beginning of a word, or leave an audible "click" where there should be silence.
In this complete tutorial, you will learn how to cut audio online with precision and professional results, which techniques to use in each situation, how to avoid the most common mistakes — all for free, right in your browser, without installing any software.
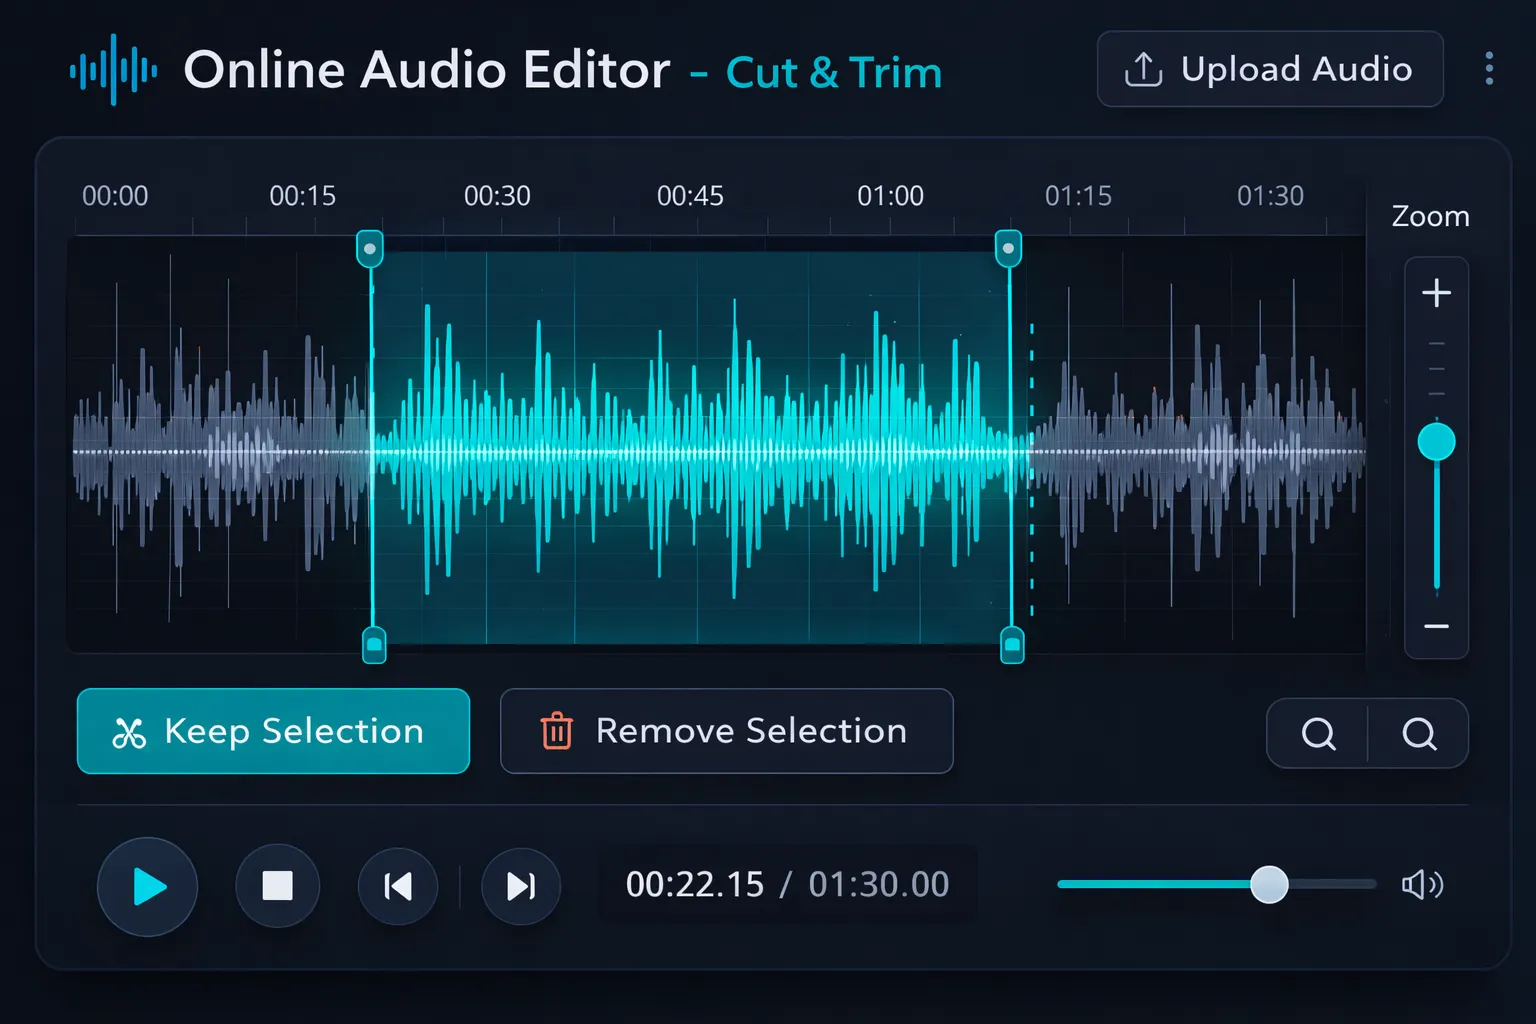
Table of Contents
- Why Is Cutting Audio the Most Important Edit?
- Understanding the Waveform Before Cutting
- Audio Cutting Techniques
- How to Cut Audio Online: Complete Step-by-Step
- Common Mistakes When Cutting Audio & How to Avoid Them
- Practical Use Cases: How Professionals Cut Audio
- Audio Cutting vs. Full Editing: When to Use Each
- Frequently Asked Questions (FAQ)
- Conclusion
Why Is Cutting Audio the Most Important Edit?
Of all audio editing operations, cutting has the greatest impact on the listener's final experience. A podcast episode with long silences and speech errors is tiring — even if the content is excellent. A lecture recording that starts 30 seconds before the teacher speaks loses the listener immediately. A song with an accidental noise in the middle destroys immersion.
Precise cutting solves all these problems. It is also the safest editing operation — unlike excessive normalization or poorly calibrated noise reduction, a good edit never degrades audio quality. It simply removes what shouldn't be there.
In professional audio production, it is estimated that 60 to 70% of editing time is dedicated to cutting — selecting, adjusting, and refining the entry and exit points of each segment. Mastering this skill is what separates an amateur recording from a professional finished product.
Understanding the Waveform Before Cutting
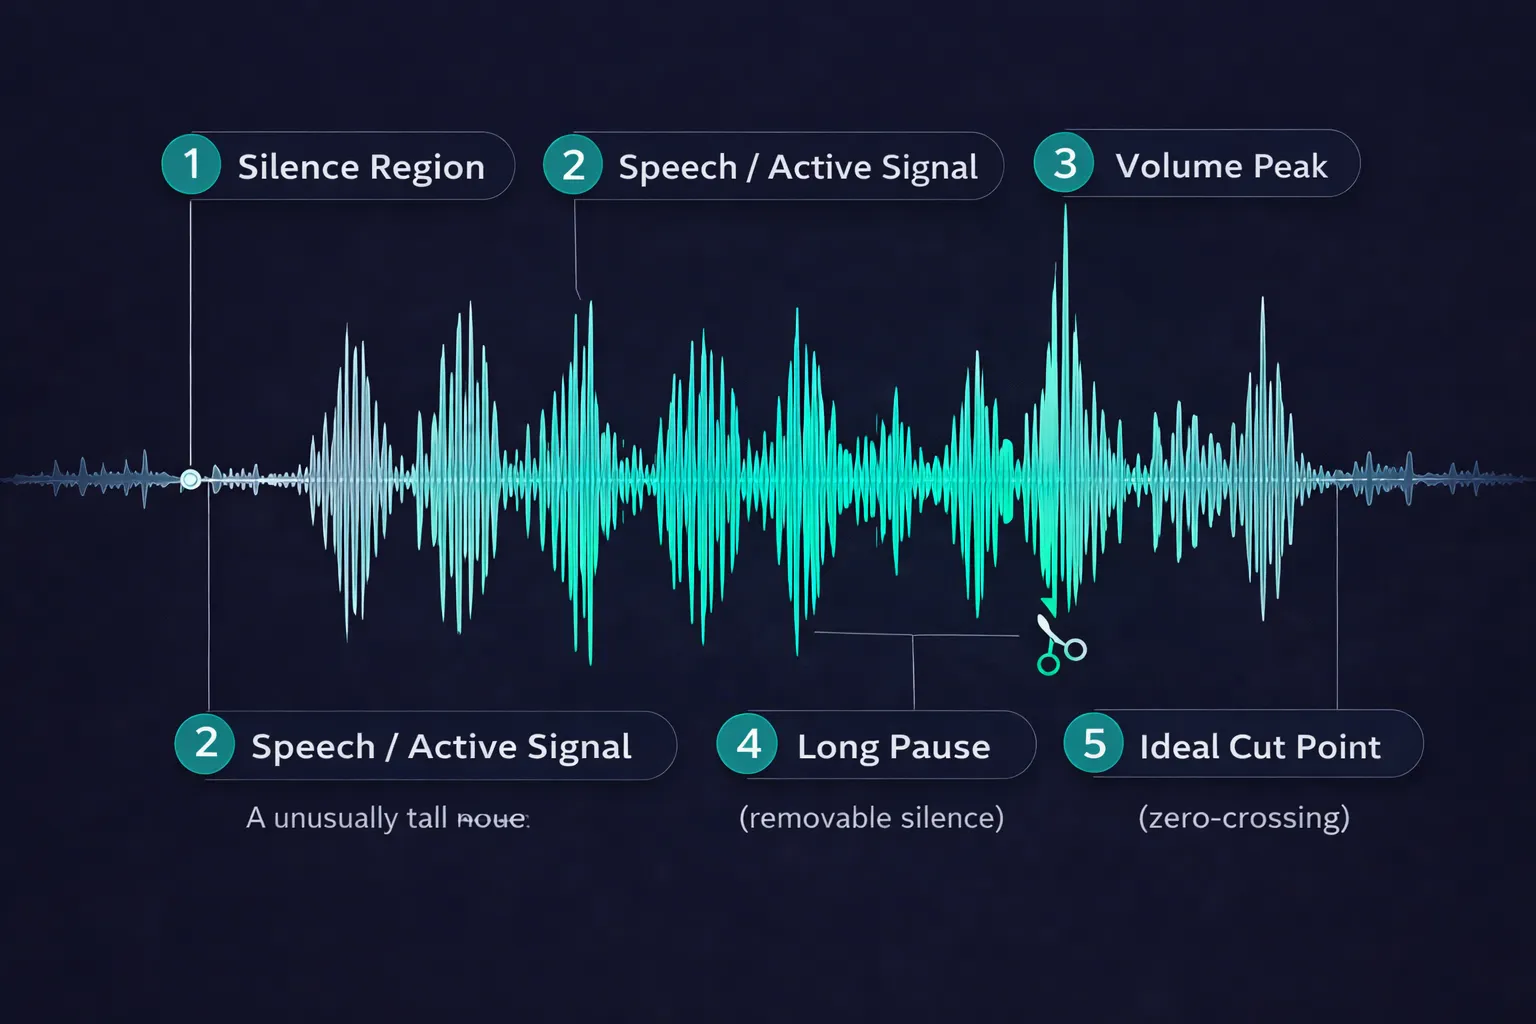
The secret to precise cuts lies in knowing how to read the waveform — the visual representation of audio that appears in the editor. Understanding what each element means in the waveform eliminates the need to listen to the entire file to find the right point.
What each waveform element represents
Amplitude (wave height): the taller the wave, the louder the sound at that moment. Tall peaks represent intense speech, claps, beats — sounds with high volume. Low or flat regions represent silence or very quiet sounds.
Width (horizontal position): represents time. The left side is the start of the file, the right side is the end. Each centimeter in the waveform corresponds to a fraction of a second of audio.
Flat regions near the center: these are silences. In voice recordings, they appear between words, sentences, and paragraphs. These are the best points for making cuts — cutting in silence avoids cutting in the middle of a word or creating an audible click.
Isolated peaks: these may be point noises — a cough, an external sound, the microphone being accidentally touched. Identifying these peaks visually before listening to the entire file saves a lot of time.
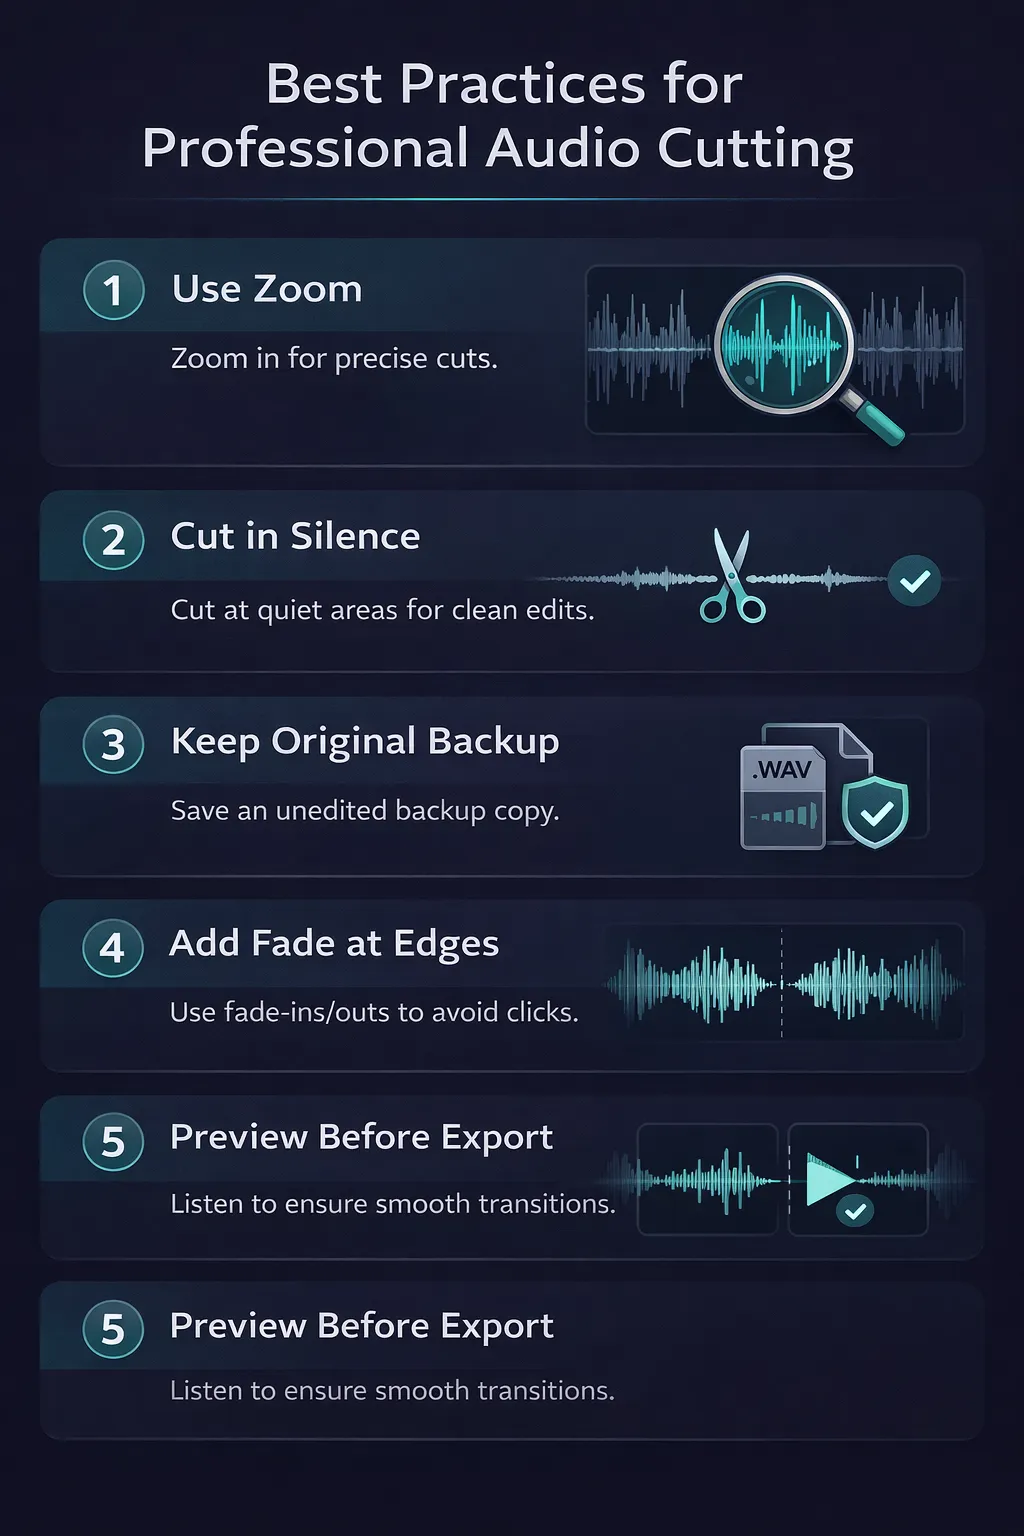
How to use zoom for precise cuts
When working with long files, the waveform appears "compressed" — many seconds per centimeter, making it impossible to position the cut with millisecond precision. Zoom brings the waveform closer, revealing details not visible in the overview.
The recommended practice is:
- Use the overview to identify the regions to cut
- Zoom into the region of interest to position the cut precisely
- Always make the cut at a point of silence or zero crossing
Audio Cutting Techniques
There are three main cutting techniques, each suited to different situations. Understanding the difference between them is essential for choosing the right approach for each project.
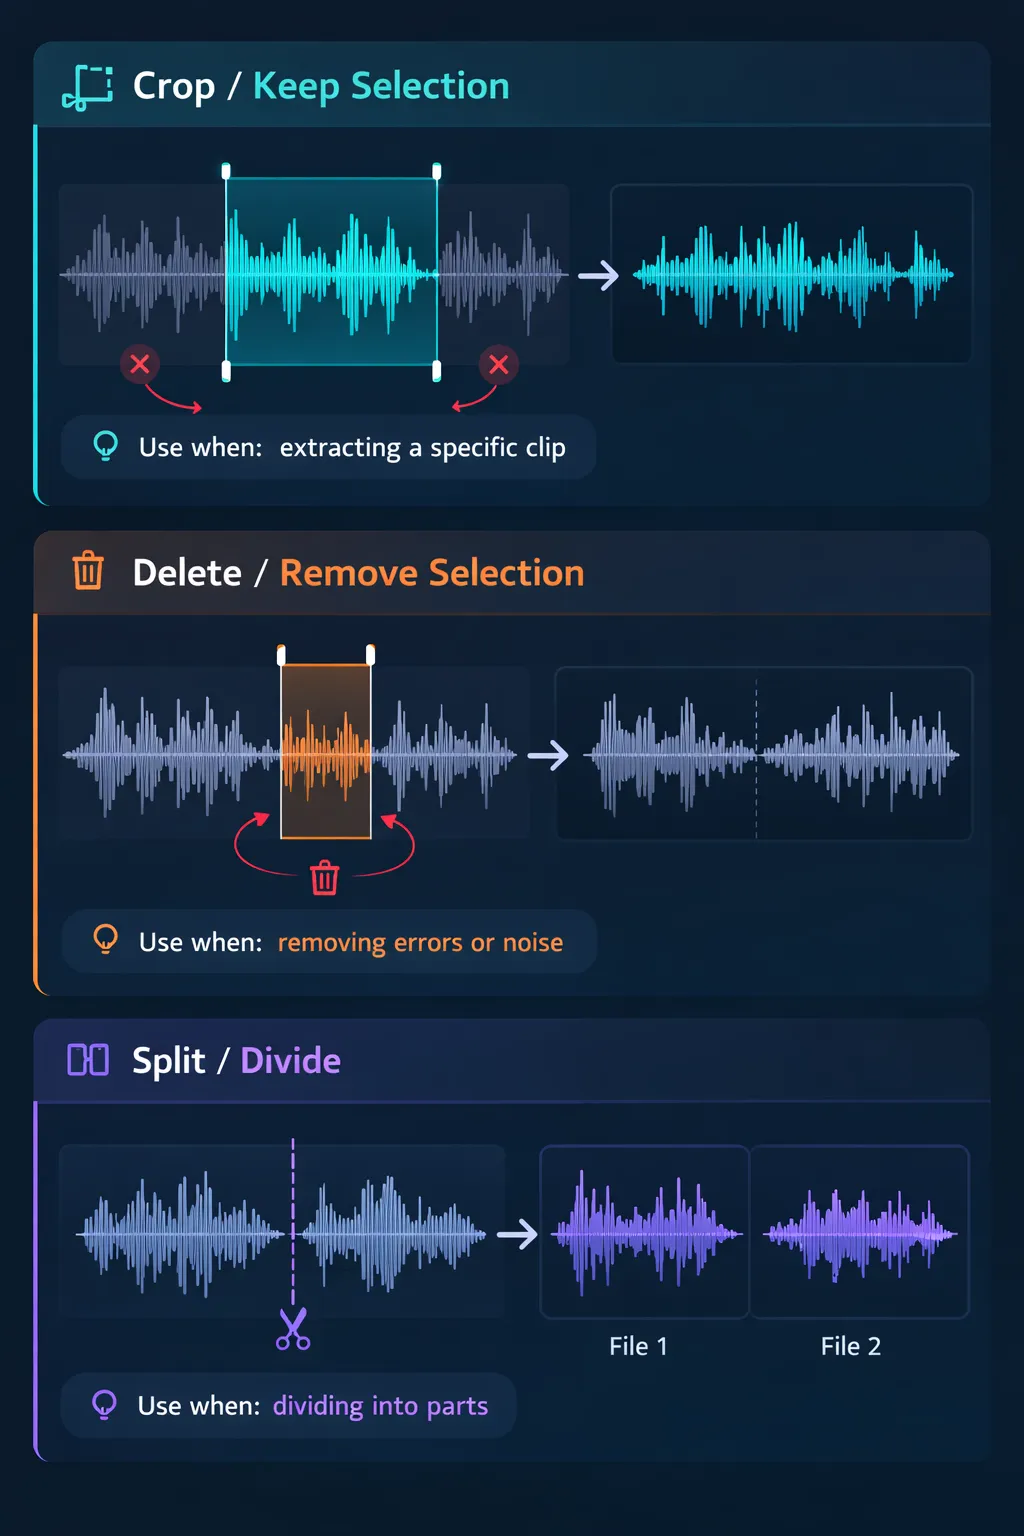
Technique 1: Crop (Keep Selection)
Crop selects a section of the waveform and removes everything outside the selection — keeping only the selected interval. It is the technique used when you want to extract a specific segment from a larger file.
When to use:
- Extract a clip from a long recording
- Create a short segment from an interview
- Isolate a sample from a song
- Create shortened versions of podcasts or lectures
Caution: crop is irreversible if you don't keep the original file. Always work with a copy or make sure the editor has an undo function before applying.
Technique 2: Delete (Remove Selection)
Delete selects a section and removes only that interval, joining the preceding and following segments. The file becomes shorter, but the rest is preserved intact.
When to use:
- Remove a speech error in the middle of a recording
- Eliminate a cough or point noise
- Cut a long pause in the middle of a podcast
- Remove an interviewer's question, keeping only the answer
Point of attention: when joining two segments with delete, check that the transition sounds natural. If the cut is between two sentences, ensure there is enough silence on both sides so the join doesn't sound abrupt.
Technique 3: Split (Divide into Parts)
Split divides the file into two or more independent segments from a specific point. Each segment can be edited, exported, or discarded independently.
When to use:
- Divide a long episode into smaller parts
- Separate chapters of an audiobook
- Create multiple clips from a long recording
- Prepare segments for publication on different platforms
How to Cut Audio Online: Complete Step-by-Step
Step 1: Access the tool and upload your file
Go to the audio cutting tool and upload your file by:
- Dragging and dropping directly onto the upload area
- Clicking the area to open the file selector
- Using the "Choose file" button on the top bar
Supported formats include MP3, WAV, FLAC, OGG, M4A, and AAC. Processing happens entirely in your browser — your files are never sent to external servers.
Step 2: Analyze the waveform
After loading, observe the complete waveform before making any edits. Visually identify:
- Where unnecessary silence is at the beginning and end
- Regions with abnormal peaks that may be point noises
- Sections with the wave very close to center (long silence)
- The general structure of the content — where speech starts and ends
Step 3: Use zoom to position the cut
For precise cuts, zoom into the region of interest using the zoom control. This reveals wave details not visible in the overview — especially zero crossings and silences between words.
Golden rule: always make the cut at a point of silence, not in the middle of an active wave. A cut in the middle of a wave cycle creates an audible click — a sudden pop that sounds artificial and is hard to remove afterward.
Step 4: Select the section
Click and drag on the waveform to select the desired interval. For precise selections, use the time fields (start and end) to set exact points in hours:minutes:seconds:milliseconds.
Before confirming the selection, use the selection playback button to listen to exactly the section that will be kept or removed.
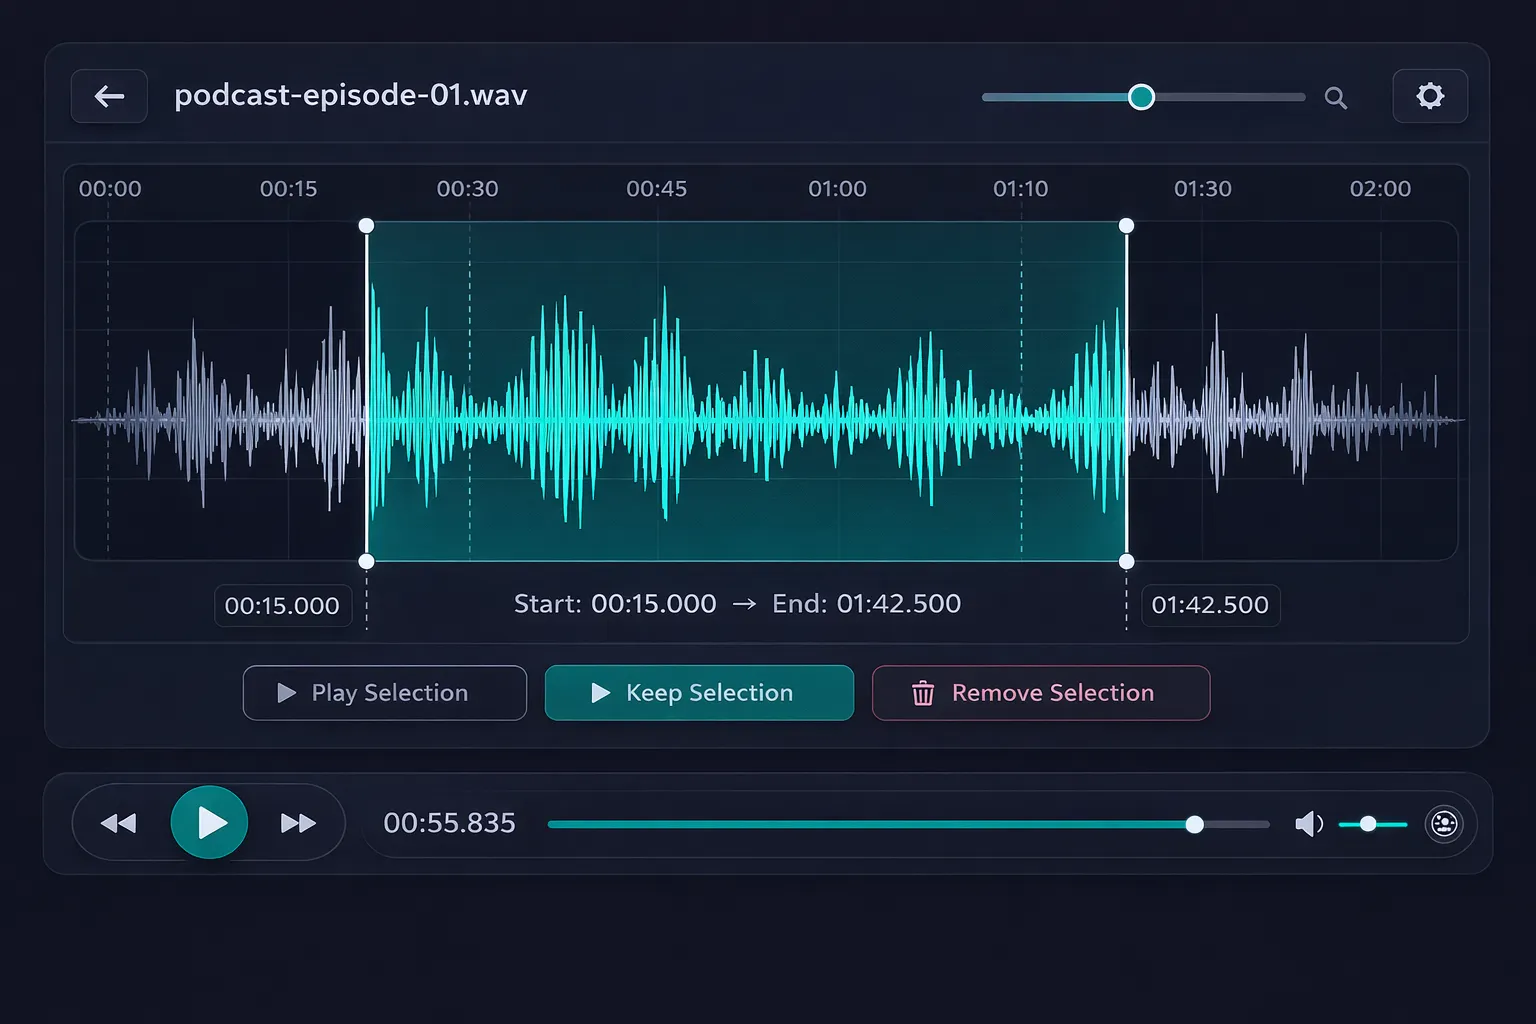
Step 5: Apply the cut
Choose the operation:
- Keep selection (Crop): removes everything outside the selection
- Remove selection (Delete): removes only the selected section
Step 6: Add fade to the edges (recommended)
After cutting, add a gentle fade in at the beginning (0.3 to 1 second) and a fade out at the end (0.5 to 2 seconds). This prevents the audio from starting and ending abruptly — one of the most obvious signs of amateur editing.
Step 7: Preview the complete result
Listen to the entire file after cutting, paying special attention to the edit points. Check that transitions sound natural, that there are no clicks or artifacts, and that the speech or music rhythm flows smoothly.
Step 8: Export in the correct format
Choose the export format appropriate for the file's destination. For podcasts, use MP3 at 192 kbps. For projects that will undergo further editing, use WAV. For archiving, use FLAC.
Common Mistakes When Cutting Audio & How to Avoid Them
Mistake 1: Cutting in the middle of an active wave
The most frequent mistake among beginners. When you position the cut point in the middle of a wave cycle (when the signal is not at zero), the editor creates an abrupt discontinuity in the signal — which the ear interprets as a "click" or pop.
How to avoid: always use zoom to verify that the cut point is in a silence region or at a zero crossing (where the wave passes through the center). Most modern editors have a "snap to zero crossing" feature that does this automatically.
Mistake 2: Cutting too close to the start of a word
In voice recordings, plosive consonants (P, B, T, D, K, G) have a very fast attack — they begin with an immediate sonic impact. If you cut too close to the start of these consonants, the listener will notice something was cut, even if they can't identify exactly what.
How to avoid: always leave 50 to 100 milliseconds of silence before the start of any word that comes right after a cut point.
Mistake 3: Not checking the transition after delete
When you remove a section from the middle of a recording with delete, the two segments are automatically joined. If both end/start with active sounds (no silence), the join can sound strange — as if two speeches with different rhythms were pasted together.
How to avoid: after delete, always listen to the cut region to verify that the transition sounds natural. If necessary, apply a micro fade (10 to 30 milliseconds) at each edge to smooth the join.
Mistake 4: Working on the original file without backup
If you edit the original file and save over it, there is no way to recover what was removed. Unlike reversible edits like equalization or normalization, cutting with export is permanent.
How to avoid: always make a copy of the original file before starting to edit. Keep the raw file untouched and always work on copies.
Mistake 5: Not using fade at cut edges
Audio that starts or ends abruptly — especially in sections cut from the middle of a recording — sounds artificial and amateur. The abrupt start of a sound is called a "hard cut" and, depending on the context, can be jarring for the listener.
How to avoid: always apply a micro fade in (0.2 to 0.5 seconds) at the beginning and a micro fade out (0.3 to 1 second) at the end of any cut segment. The result sounds much more natural and professional.
Practical Use Cases: How Professionals Cut Audio
Podcasters: Editing a Full Episode
A raw podcast episode typically has:
- 30 to 60 seconds of silence or testing at the beginning
- Various speech errors scattered throughout the recording
- Long pauses while the host thinks or drinks water
- Point noises (cough, chair squeak, phone notification)
- Long silence at the end after the "cut!"
The professional podcaster's editing workflow for a 60-minute episode:
- First pass: listen at 1.5x speed and mark the cut points
- Remove long silences (pauses over 2 seconds between speech)
- Remove speech errors and restarts ("umm," "uh...," sentence restarts)
- Trim the beginning and end of the episode
- Listen at normal speed to check rhythm and transitions
- Apply fade in and fade out at the edges
Musicians: Creating Samples and Segments
Musicians who work with samples need surgical precision in their cuts — especially when the sample will be used in a loop. A loop with a poorly positioned cut point creates an audible click every time it restarts.
To create a perfect loop, the start and end points must be at zero crossings — ideally at the same point in the wave cycle's phase. This ensures the end-to-start transition is perfectly continuous.
Journalists and Reporters: Editing Interviews
In interview editing, cutting is used to:
- Remove long questions, keeping only the answers
- Join segments from different moments of the interview coherently
- Remove hesitations, coughs, and interviewee noises
- Create a fluid narrative from answers that were not linear
The main challenge is maintaining the naturalness of speech after cuts — the interviewee should not sound obviously "edited." Well-positioned cuts within the natural silences between sentences are the key.
Teachers: Preparing Recorded Lessons
Lesson recordings often have:
- Moments when the teacher writes on the board in silence
- Pauses while waiting for student questions
- Repetitions and explanation restarts
- Exercise sections that don't need to be in the final recording
Cutting these sections before publishing on the LMS (Learning Management System) significantly improves the student experience and reduces total lesson time without losing content.
Audio Cutting vs. Full Editing: When to Use Each
The cutting tool is ideal for most everyday situations. But in some cases, you will need a larger set of tools. The table below helps you decide:
| Need | Cutting Tool | Full Editor |
|---|---|---|
| Remove silences and errors | ✅ Ideal | ✅ Also works |
| Extract a specific segment | ✅ Ideal | ✅ Also works |
| Apply equalization | ❌ Not available | ✅ Required |
| Reduce background noise | ❌ Not available | ✅ Required |
| Normalize volume | ❌ Not available | ✅ Required |
| Add fade in/out | ✅ Available | ✅ Available |
| Change speed | ❌ Not available | ✅ Required |
| Quick and simple projects | ✅ Faster | ⚠️ More complex |
| Full podcast production | ⚠️ Partial | ✅ Recommended |
For projects that only require cutting, the dedicated tool is the fastest and most direct option. For projects that combine cutting with other processing, use the full audio editor to execute everything in a single session.
Frequently Asked Questions (FAQ)
Is it possible to cut audio without losing quality?
Yes. Cutting itself does not degrade audio quality — it simply removes parts of the file. The only risk of quality loss is in export: if you export an MP3 file after editing, there will be a slight additional loss from recompression. To avoid this, work with WAV during editing and export to MP3 only at the final step.
How do I cut a section from the middle of audio without affecting the rest?
Use the delete technique: select only the section you want to remove, apply "remove selection," and the editor automatically joins the preceding and following segments. The file becomes shorter, but the rest is preserved intact. Always verify the transition after the cut.
What is a "cut click" and how do I avoid it?
A cut click is an audible pop that appears when the cut point is positioned in the middle of an active wave cycle — where the signal is not at zero. To avoid it, always use zoom and position the cut in a silence region. Many editors have a "snap to zero crossing" feature that does this automatically.
Can I cut audio from videos?
The tool processes pure audio files. For videos, you first need to extract the audio track, make the cut, then reinsert it into the video with a video editor. Tools like VLC allow you to easily extract audio from videos.
What is the smallest section I can cut?
Cut precision in Audio-Editor Online is down to milliseconds — technically you can cut sections less than 1 ms in duration. In practice, cuts below 50 ms are rarely useful and may create audible artifacts. The practical limit for a useful, natural cut is about 100 ms (0.1 seconds).
Can I undo a cut after applying it?
Yes, as long as you have not exported the file. The editor maintains an edit history and allows undo with Ctrl+Z (or Cmd+Z on Mac). After export, the saved file no longer has undo functionality — which is why it's important to always keep the original file as backup.
Does the tool work with large files?
Yes. Processing is local and the limit is your device's memory. On most modern computers, files up to 200 MB are processed without issues. For larger files, make sure you have at least 4 GB of available RAM.
Can I cut multiple sections at once?
You can make multiple sequential cuts in the same editing session. Apply each cut individually, verify the result, and proceed to the next. The undo history lets you revert any cut that didn't turn out as expected.
Conclusion
Cutting audio with precision is the most fundamental skill in sound editing — and the one that most impacts the perceived quality of the final result. With the right techniques, you transform raw recordings into polished, professional content without the listener noticing any sign of editing.
The essential principles you learned in this guide:
- Read the waveform before cutting — it reveals everything you need to know
- Always cut in silence or at a zero crossing to avoid clicks
- Use zoom for millisecond-precise cuts
- Add fade at the edges for natural transitions
- Keep backup of the original file before any editing
- Always preview before exporting — especially at cut points
For a practical test, use the audio cutting tool on Audio-Editor Online right now — using the workflow described above.
Have questions about cutting audio or want to share your experience? Reach out via our contact form.