Quick answer
Reverb is the most-used effect in music production and the easiest to overdo. This guide explains what you are hearing when you hear a room, what each control changes, how to add reverb in the browser, what our test measured, and how to choose an amount that helps a recording instead of drowning it.
What reverb is, physically
A sound in a room reaches you three ways. First the direct sound, in a straight line. A few milliseconds later the early reflections: single bounces off the nearest walls, floor and ceiling, which tell your brain how big the room is. Then the late reverberation: reflections of reflections, so dense they merge into a smooth wash that decays exponentially. Hard, bare rooms decay slowly; rooms full of soft surfaces and people decay fast.
Wallace Sabine measured this at Harvard in the 1890s and found that the decay time grows with the volume of the room and falls with the amount of absorption in it. The figure he defined, RT60, is still the standard. Some typical values:
| Space | Typical RT60 | Closest preset |
|---|---|---|
| Furnished living room, vocal booth | 0.3 – 0.6 s | Small Room / Studio Booth (0.8 s) |
| Classic studio plate (a metal sheet, not a room) | 1 – 3 s | Vintage Plate Reverb (1.6 s) |
| Concert hall | 1.8 – 2.2 s | Concert Hall (2.6 s) |
| Large stone church | 4 – 8 s | Cathedral / Sacred Church (4.5 s) |
How to recognize reverb, and its absence
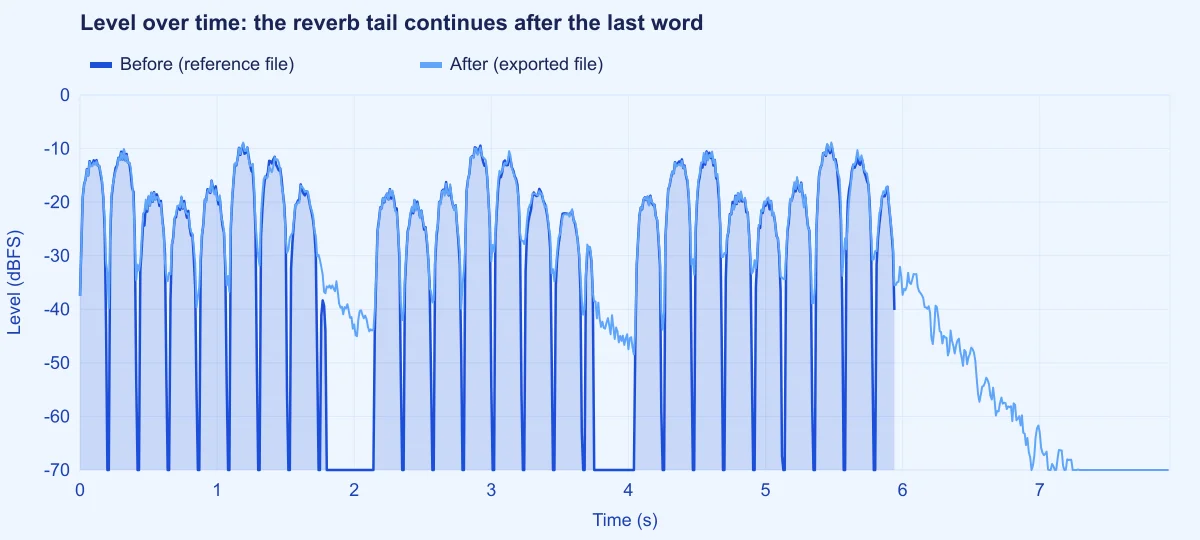
Listen to the end of a word followed by a pause. In a dry recording, the word stops and there is silence. With reverb, the word continues as a soft wash for a fraction of a second or longer. On the waveform, a dry voice has clean gaps between phrases; a reverberant one has gaps filled with a low, decaying haze. Figure 2 shows exactly that difference on our test file.
What each control does
The editor builds a synthetic impulse response, the "fingerprint" of a room, from decaying noise shaped by your settings, and convolves the voice with it. Each control changes that fingerprint:
- Decay time (RT60), 0.2 to 6 s: how long the tail lasts. The main control of room size.
- Reverb level (wet), 0 to 100%: how loud the room is against the dry sound. Most of the "too much reverb" problems are here, not in the decay.
- Pre-delay, 0 to 80 ms: a gap before the reflections start. 20 to 40 ms keeps a voice clear in front of a long reverb, because the first syllable is heard before the room answers.
- Damping (high cut), 2 to 16 kHz: how quickly high frequencies die in the tail. Real rooms absorb highs faster than lows; low values sound warm and distant, high values bright and metallic.
- Echo delay (0 = off) and Echo feedback: distinct repeats on top of the reverb, from a single 110 ms slapback to rhythmic echoes.
The impulse is slightly different on each side, so a mono voice comes out in stereo with a sense of width. The file also grows by the decay time, up to 5 seconds, so the tail is never cut off at the end.
How to add reverb, step by step
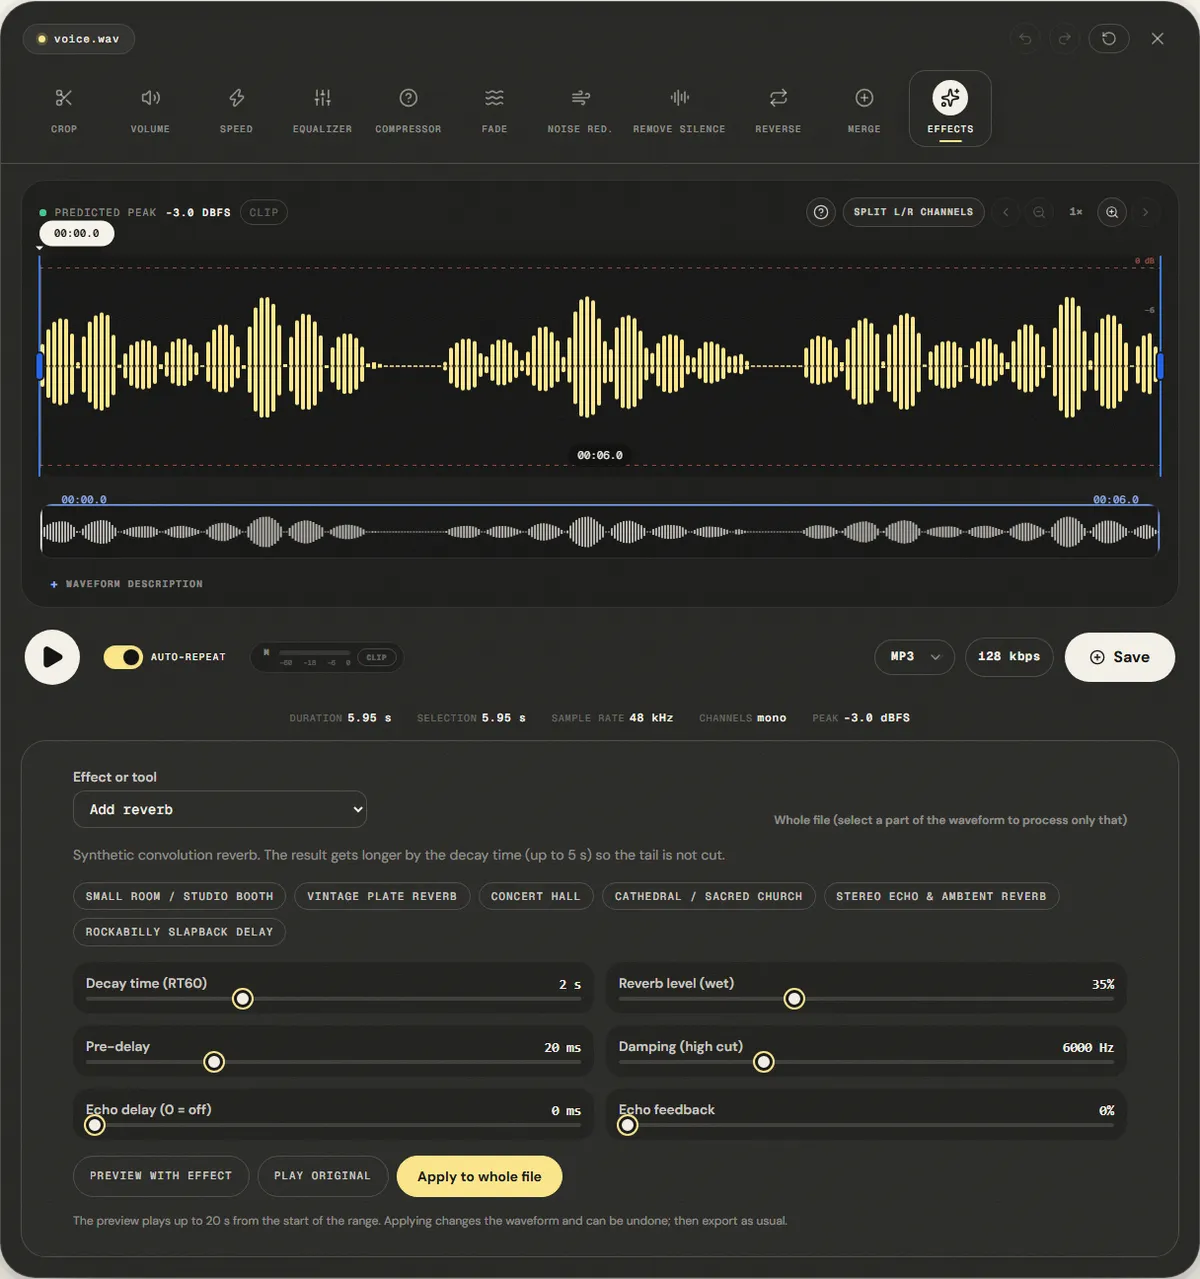
The Add Reverb page opens the file in the editor with Add reverb selected in the Effect or tool menu. It runs in your browser.
Step 1: Start from a preset
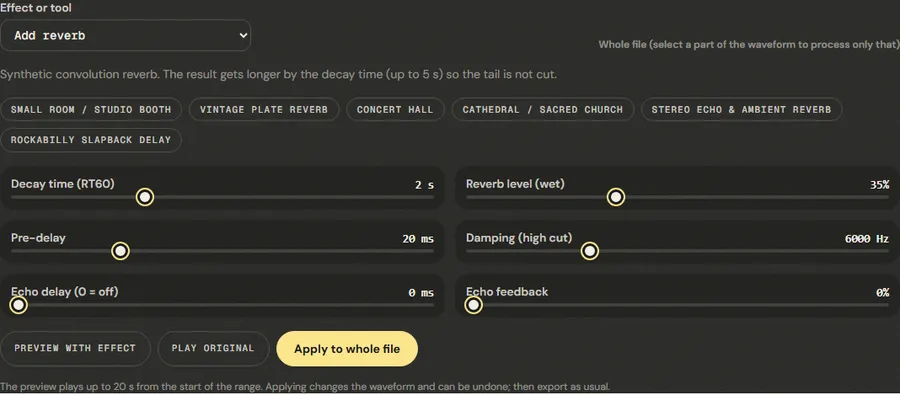
- Small Room / Studio Booth: 0.8 s, 25% wet. A touch of space for voice-overs.
- Vintage Plate Reverb: 1.6 s, bright, for vocals and snare.
- Concert Hall: 2.6 s with 25 ms pre-delay, for strings and piano.
- Cathedral / Sacred Church: 4.5 s, 50% wet, dark. An effect, not a mix tool.
- Stereo Echo & Ambient Reverb: 350 ms echoes over a short room.
- Rockabilly Slapback Delay: a single 110 ms repeat, the 1950s vocal sound.
Step 2: Adjust the amount, then the size
Lower Reverb level (wet) until you barely notice the reverb, then raise it slightly. That is usually the right amount for speech. Change Decay time only if the space sounds too big or too small. Add Pre-delay if words start to blur.
Step 3: Preview, apply and check the end
Preview with effect plays up to 20 seconds with the reverb. Then click Apply to whole file, play the last few seconds to hear the tail fade out, and export.
Starting points by material
These are starting points, not rules. Set them, then adjust the wet level by ear.
| Material | Decay | Wet | Notes |
|---|---|---|---|
| Podcast, audiobook | none, or 0.5–0.8 s | 0–15% | Dry is the norm; reverb makes speech harder to follow on headphones |
| Voice-over for video | 0.6–1 s | 10–20% | Match the room in the picture rather than adding a hall |
| Sung vocal | 1.2–1.8 s | 20–30% | 20–40 ms pre-delay keeps the words in front |
| Acoustic guitar, piano | 1.8–2.4 s | 15–25% | Lower damping for a warmer tail |
| Ambient, sound design | 3–6 s | 40–60% | The reverb is the sound; check the peak level |
A useful check: switch between the preview and the original several times. If you notice the reverb only when it is switched off, the amount is usually right.
Measured example
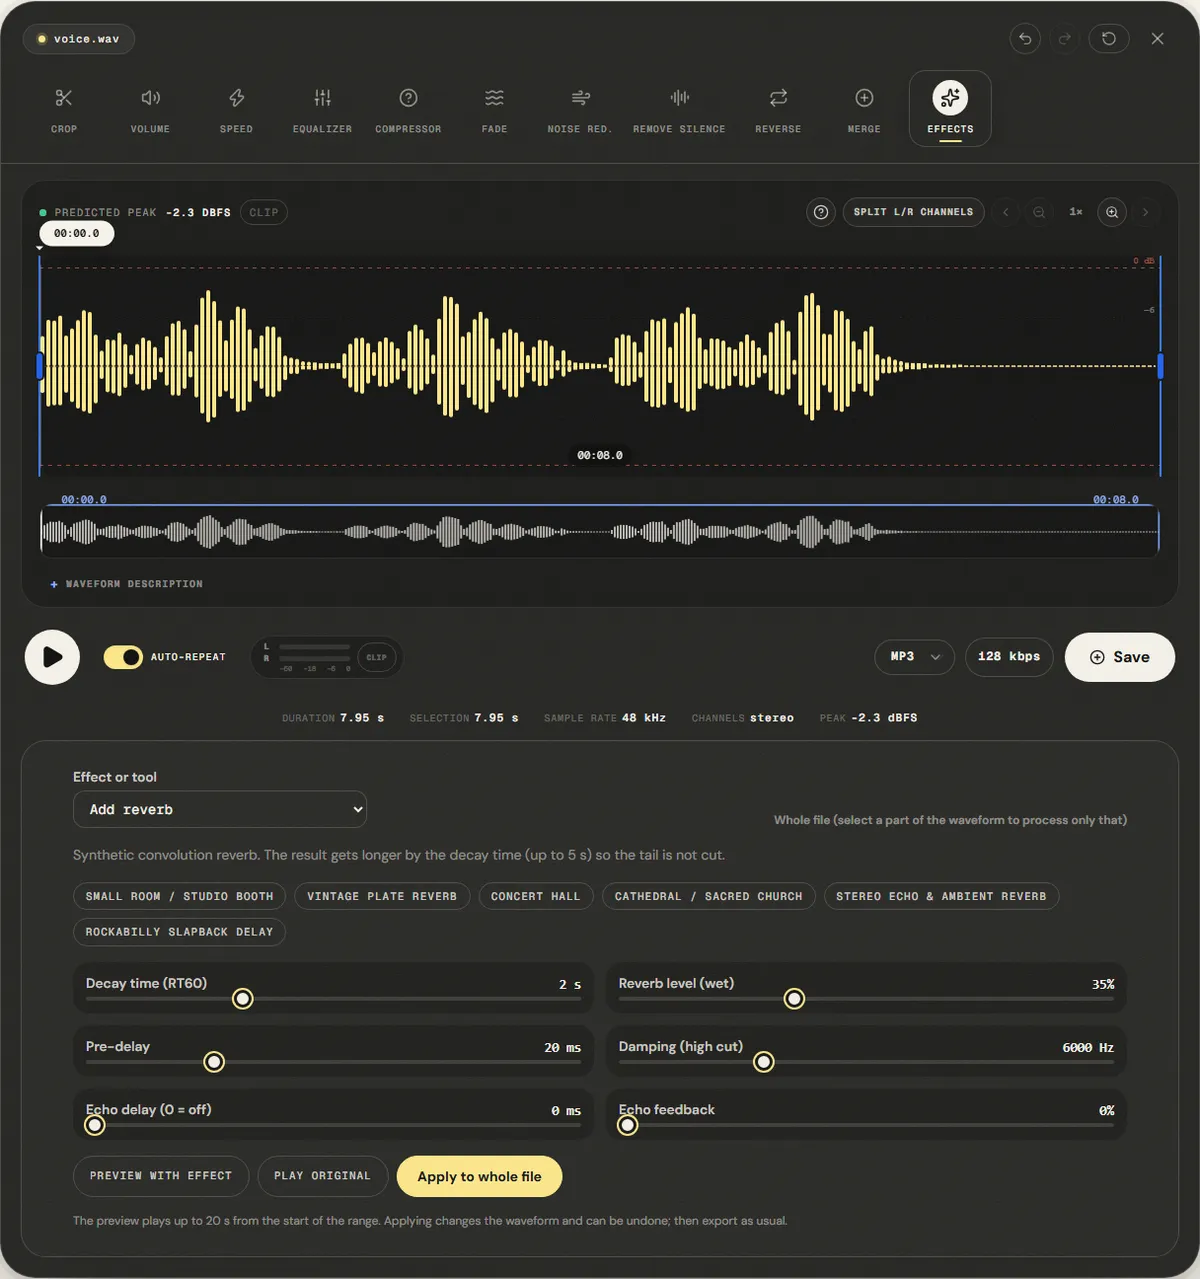
We applied the default reverb (2-second decay, 35% wet, 20 ms pre-delay) to the dry reference voice and exported WAV.
The file grew from 5.95 s to 7.95 s, the 2-second decay, so the tail is not cut. Sound above −60 dBFS now lasts until 7.16 s, 1.21 s past the last word. The mono voice came out in stereo, because the reverb is different on each side.
| Measured | Before | After |
|---|---|---|
| Duration | 5.95 s | 7.95 s |
| Audible until (−60 dBFS) | 5.95 s | 7.16 s |
| Sample peak | -3.0 dBFS | -2.9 dBFS |
| Average level (RMS) | -17.7 dBFS | -18.8 dBFS |
Reference file (before)
Exported file (after)
The peak rose to -2.9 dBFS because reflections add to the dry signal. With long decays and wet levels near 100%, check the peak before exporting.
Download the reference file (WAV) · Same test on the tool page · Measured on November 11, 2026
Troubleshooting
| What you hear or see | Likely cause | What to change |
|---|---|---|
| The voice sounds far away or muddy | Wet level too high | Lower the wet level first; keep decay under 1 s for speech |
| Words blur into each other | Reflections start at the same time as the voice | Add 20–40 ms of pre-delay |
| The tail sounds metallic | Damping set very high | Lower damping to 5–8 kHz |
| The recording already had a room sound, and now it has two | Reverb added on top of a reverberant recording | Use a small preset, or none; reverb cannot be removed afterwards |
| The end of the file sounds cut off | The file was trimmed after the reverb was applied | Keep the extra seconds the effect adds, or fade them out |
Limits and alternatives
This is a synthetic convolution reverb: convincing and smooth, but it does not model a specific real room. Convolution plugins that load measured impulse responses of famous halls and studios, and algorithmic reverbs with modulation and separate early-reflection controls, offer more character. The editor applies reverb to the whole selection as one pass; it cannot place different instruments in different rooms, which a multitrack DAW does with send effects.
The opposite direction is harder: removing reverb from a recording is a different, much more difficult problem, and this tool does not do it. When recording, use the deadest room you have; reverb is easy to add later and nearly impossible to take away.
Frequently asked questions
What is RT60?
Why did my file get longer?
How much reverb should a podcast have?
Why is my mono file now stereo?
Can this tool remove reverb?
Sources and how this was tested
Tested on November 11, 2026 in Chromium 153 on Windows 11, with a production build of this site. Screenshots and measurements were made by the scripts in scripts/tool-evidence, from synthetic reference files anyone can download and repeat.