Quick answer
Clipping is the most common way a recording gets damaged, and the one people most often try to fix with the wrong tool. This guide shows how to tell clipping from other distortion, what a repair can and cannot bring back, how to run it in the browser, and the numbers from our own test, including a problem we found in our own tool while writing it.
How to recognize clipping
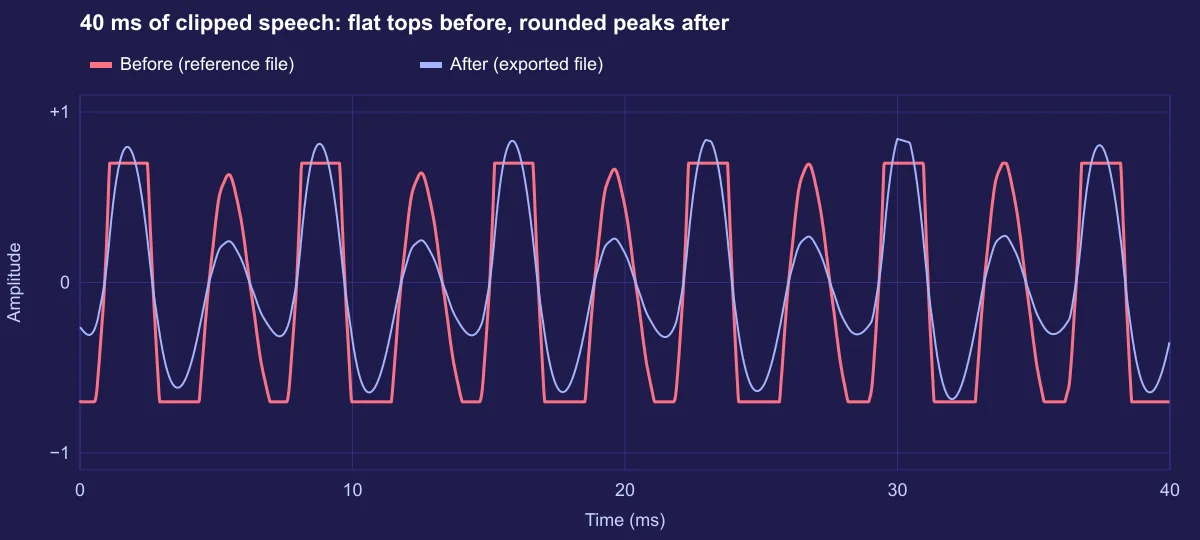
On the waveform, clipping shows as peaks that hit an invisible ceiling and stay there: flat tops instead of points. If the ceiling is 0 dBFS, the flat lines touch the top and bottom edges of the display. If the file was turned down after it clipped, the flat tops sit lower, but they are still flat, and the loudest parts of the file all stop at exactly the same height.
By ear, clipping is a crackle or rasp that appears only on the loud moments: a laugh, a stressed word, a drum hit. Quiet passages sound clean. That is the difference from a bad microphone or heavy noise, which colour everything evenly.
Zooming into 40 milliseconds makes the damage obvious. In Figure 2 the red line is the clipped file: the tops are cut flat at the same level, cycle after cycle. The blue line is the same moment after the repair.
Why clipping happens, and why it sounds harsh
A digital recorder stores each sample as a number with a fixed maximum. In floating-point editing that maximum is ±1.0, called 0 dBFS (decibels relative to full scale). When the microphone signal is louder than that, the converter has no larger number to write, so every sample above the limit is stored at the limit. The waveform gets its top sliced off.
A flat top is a sharp corner, and sharp corners contain energy at many high frequencies the original sound never had. That is the rasp you hear. In a digital system some of those new frequencies land above half the sample rate and fold back down as unrelated tones (aliasing), which is why digital clipping sounds harsher than the gentle saturation of tape or a tube amplifier.
The usual causes:
- Gain set for normal speech, then someone laughs or shouts. Speech peaks can be 15 to 20 dB above the average level.
- Phone and laptop microphones close to a loud source, such as a concert, a car or a speaker phone.
- Processing that adds gain: a compressor with too much make-up gain, an equalizer boost, or a normalize to 0 dBFS on a file that later goes through a format conversion.
Clipping below 0 dBFS
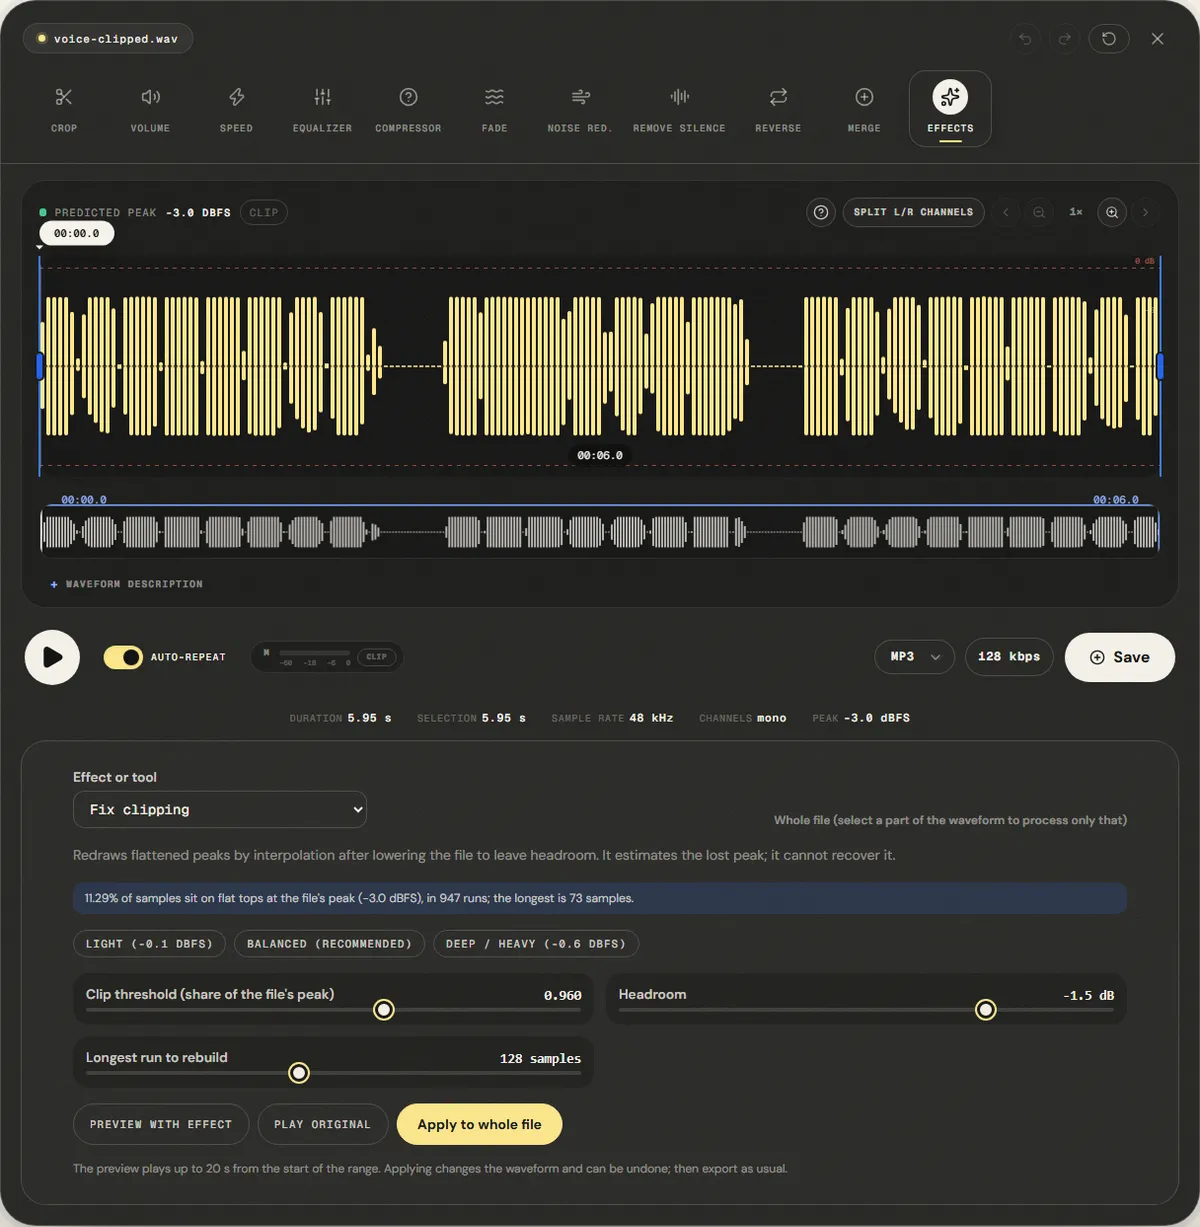
A clipped recording that is later turned down keeps its flat tops, only lower. A phone app that clips and then applies its own gain, or a take that was clipped in the interface and normalized afterwards, both end up like this. Until November 2026, our editor looked for clipping only near 0 dBFS, so it reported "no clipped runs" on exactly these files and the repair did nothing. It now measures the threshold as a share of the file's own peak, as Audacity's Clip Fix does, so flat tops at −3 dBFS are found like flat tops at 0 dBFS.
Sample peaks and true peaks
A flat top has another side effect. When the file is resampled or played back, the reconstructed wave overshoots between the samples, so the real peak is higher than any stored sample. Our clipped file sat flat at 0.700; after the browser resampled it to 48 kHz, the highest sample was 0.709. Loudness standards measure this "true peak" with oversampling (ITU-R BS.1770) and recommend keeping it at or below −1 dBTP (EBU R128). It is one more reason the repair leaves headroom.
How to repair clipping, step by step
The Fix Clipped Audio page opens your file in the editor with Fix clipping selected in the Effect or tool menu. Everything runs in your browser.
Step 1: Open the file and read the panel
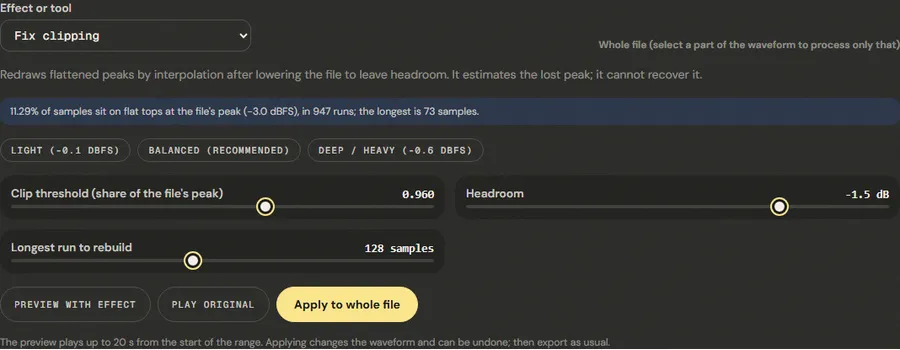
When the file opens, the panel counts the samples that sit on flat tops near the file's peak and reports how many runs it found and how long the longest one is. On our reference file it read "11.29% of samples sit on flat tops at the file's peak (−3.0 dBFS), in 947 runs; the longest is 73 samples." On a clean file it says no flat-topped peaks were found, and suggests that any distortion you hear is not clipping this tool can redraw.
Step 2: Choose a preset
- Light (-0.1 dBFS): threshold at 98.5% of the peak, highest redrawn peak capped at −1 dBFS. For a few peaks that barely touched the ceiling.
- Balanced (Recommended): 96% of the peak, capped at −1.5 dBFS. The default, and what we measured.
- Deep / Heavy (-0.6 dBFS): 93% of the peak, capped at −2.5 dBFS, with longer runs redrawn as curves. For recordings that are clipped through most of their loud parts.
The sliders expose the same three settings. Clip threshold (share of the file's peak) goes from 0.900 to 0.999; Headroom from 0 to −6 dB; Longest run to rebuild from 32 to 256 samples. Runs longer than that last value get a simple arch instead of the cubic curve, a rougher guess for the longest flat stretches.
Step 3: Whole file or a selection
With nothing selected the whole file is processed. You can drag across a single loud passage to repair only that, but remember that the headroom step lowers whatever was processed: a repaired selection can end up quieter than the audio around it. For most files, apply to the whole file and normalize afterwards.
Step 4: Compare, apply, then restore the level
Preview with effect and Play original play the same stretch (up to 20 seconds) so you can compare the loudest moment. Then click Apply to whole file. The waveform updates and the undo button becomes active. Because the result is quieter, finish with the normalizer at a sensible target, then export.
Measured example
We drove the reference voice 11 dB too hot and cut every peak flat at -3.1 dBFS, the shape an overloaded recorder leaves. We applied the Balanced (Recommended) preset to the whole file.
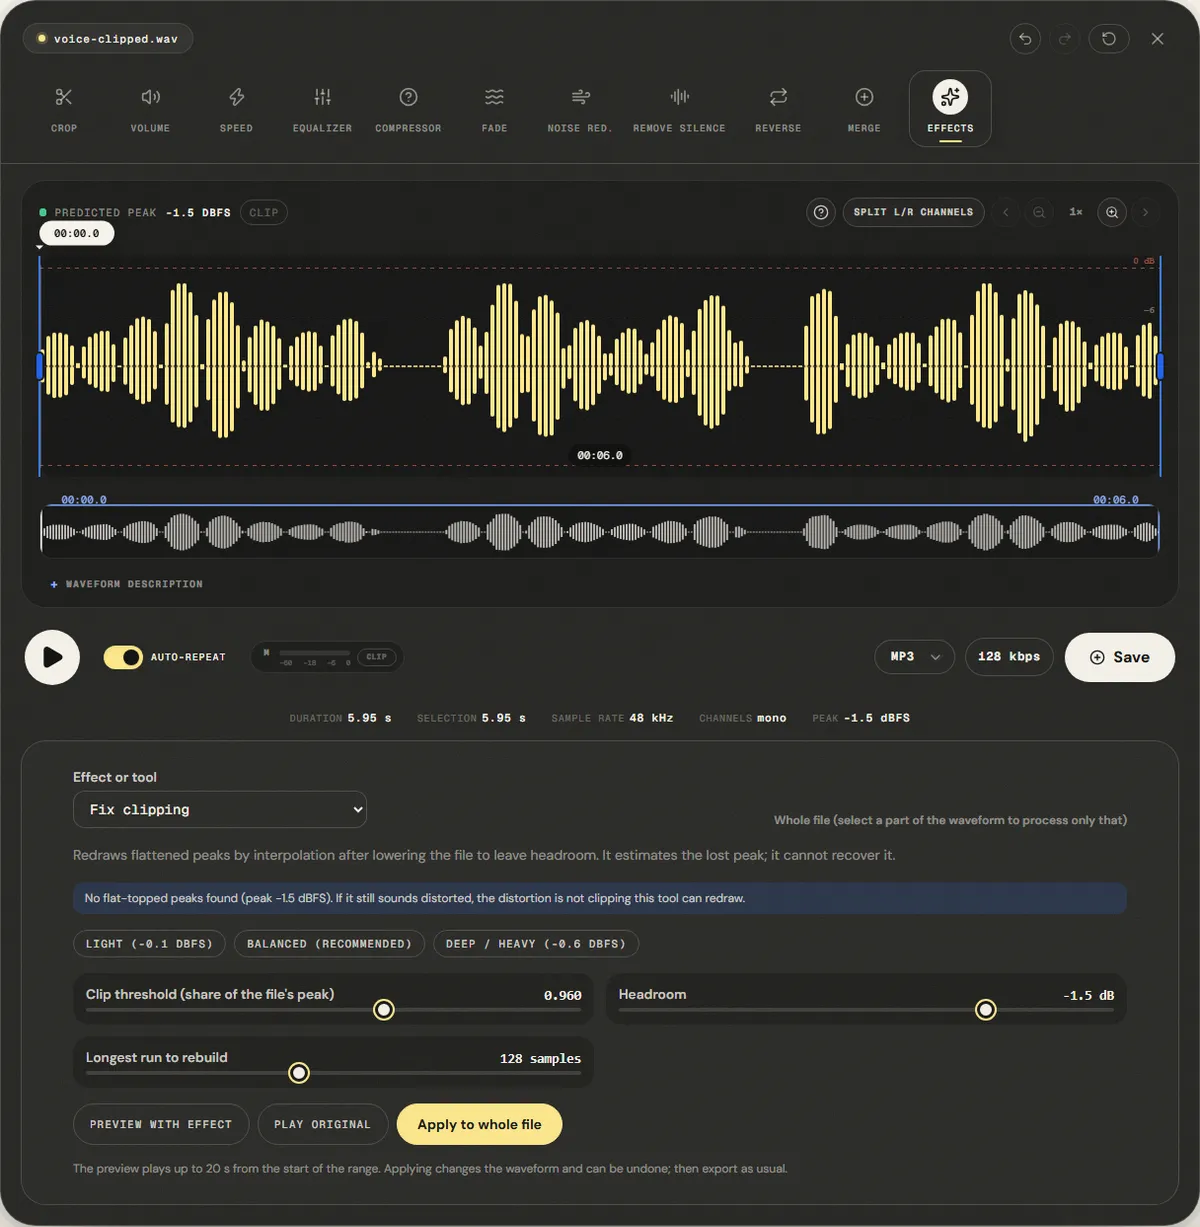
Samples piled up at the peak went from 11.6% to 0.05%: the flat tops are curves again. The redrawn peaks rose above full scale, so the tool turned the whole file down until the highest one sat at -1.5 dBFS. That is why the average level fell from -9.6 dBFS to -15.0 dBFS.
| Measured | Before | After |
|---|---|---|
| Samples piled up at the peak (within 3%) | 11.6% | 0.05% |
| Sample peak | -3.1 dBFS | -1.5 dBFS |
| Average level (RMS) | -9.6 dBFS | -15.0 dBFS |
Reference file (before)
Exported file (after)
The redrawn curve is an estimate, not the original waveform, and on heavily distorted recordings the harshness drops but does not disappear. Expect the file to come out quieter; normalize it afterwards.
Download the reference file (WAV) · Same test on the tool page · Measured on November 11, 2026
We also ran the opposite check: the same repair on our clean reference voice, which has no clipping. The panel reported no flat-topped peaks, and applying the repair anyway changed 0.035% of the samples, by at most −54 dB. A smooth peak that happens to cross the threshold is redrawn almost exactly as it was, so running the tool on a clean file does no audible harm.
Troubleshooting
| What you hear or see | Likely cause | What to change |
|---|---|---|
| The panel finds no flat tops, but the recording sounds distorted | Analogue or soft clipping (rounded, not flat), or distortion inside the microphone | This tool cannot help; reduce the harshness with the equalizer around 2–5 kHz, or re-record |
| The repaired file is much quieter | The redrawn peaks are taller than the old ceiling, so the file was turned down to fit them | Normalize after repairing |
| A repaired section is quieter than the rest | The repair was applied to a selection, and only the selection was turned down | Undo and apply to the whole file, or raise that section with the volume tool |
| Some crackle remains on the loudest words | Very long clipped runs, redrawn as simple arches | Try Deep / Heavy, or raise Longest run to rebuild to 256 |
| The file is an MP3 of a clipped recording and the panel finds few runs | The encoder smooths the flat tops, so fewer samples sit exactly at the peak | Use the original WAV if you have it; otherwise try the Deep / Heavy threshold (93%) |
Limits and alternatives
A declipper estimates what the peak probably looked like from its surroundings. It removes the crackle, but the curve it draws is a guess, not the sound the microphone heard. The guess is good when the flat runs are short, a millisecond or two, and gets worse as they grow: a run of 70 samples at 48 kHz is 1.5 ms of missing waveform, and in heavily overdriven recordings whole syllables can be clipped.
Dedicated restoration software (iZotope RX, Adobe Audition and others) uses longer context, spectral models and several passes, which helps on heavy clipping. None of them can recover a recording that was clipped for most of its duration. If the take can be repeated, lower the input gain so the loudest moment peaks around −12 to −6 dBFS, and the problem never starts.
Two kinds of distortion look similar but are not clipping. Soft clipping from an analogue preamp or a limiter rounds the peaks instead of cutting them, so there is nothing flat to find. Distortion inside a cheap microphone capsule is spread across the waveform. In both cases a gentle cut with the equalizer in the 2 to 5 kHz range makes the harshness less tiring, but does not remove it.
Frequently asked questions
Can clipped audio be fixed completely?
Why is my file quieter after the repair?
Does it work on clipping that was turned down later?
Will it damage a recording that is not clipped?
Should I repair clipping before or after noise reduction?
Sources and how this was tested
- Audacity Manual: Clip Fix (threshold relative to the selection's peak)
- ITU-R BS.1770: algorithms to measure loudness and true-peak level
- EBU R 128: loudness normalisation and permitted maximum level
Tested on November 11, 2026 in Chromium 153 on Windows 11, with a production build of this site. Screenshots and measurements were made by the scripts in scripts/tool-evidence, from synthetic reference files anyone can download and repeat.